Ever worked on something that looks great to your users, but behind the scenes, it's a hot mess? That was me with my plain React codebases.
On the developer's side of things, it was a nightmare trying to keep everything in line. And let's face it, in the fast-paced world of JavaScript web development, if you're not moving forward, you're falling behind.
Then I heard about Next.js, a React framework packed with numerous built-in features to make a developer's life easier. On October 26, 2022, Vercel released Next.js 13, and with it, things got shaken up even more with the new app router.
So why did I make the switch from React to Next.js for my front-end code? In this article, I'll explain the reasons why I switched, and why it feels like the best move I've made in a while. We'll dig into the benefits, the cool stuff that's saving me a lot of time, and how learning a new framework wasn't as bad as it sounds.
File System-Based Routing
With Next.js, the URL structure is generated based on the project's files and folders, making routing a breeze, especially when compared to fiddling with the setup for react-router. The folders within the app directory dictate the routes, and the UI for a specific route is defined by a page.tsx file within that folder.
For example, app/profile/settings/page.tsx is the UI for the /profile/settings route.
This also opens the doors to layouts and nested routing. When you use a file with the name of layout.tsx, you define a UI that is shared across multiple places and is inherited by the child routes. A layout can render another layout or a page inside of it.
Whenever a route changes to any component that is within the layout, its state is preserved because the layout component is not unmounted, it remains interactive, and does not re-render (more on this in Partial Rendering). In a nested route, the components of a segment will be nested inside the components of its parent segment.
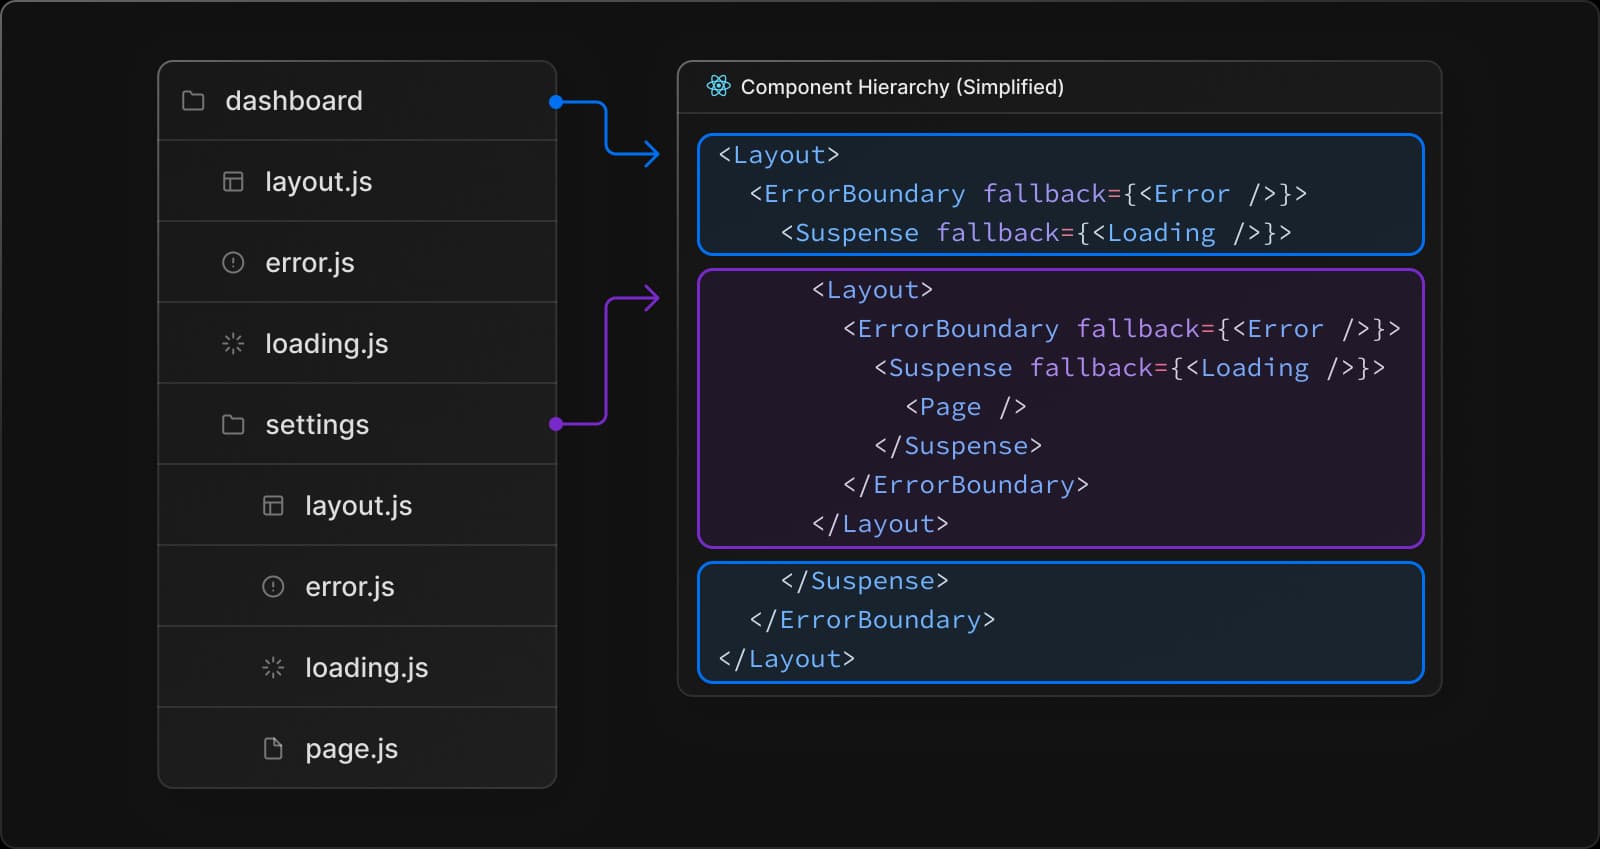
This is also really interesting because there are a bunch of file naming conventions for things like loading and errors that can render a different UI at the component level based on its current state. For example, if a component breaks, it will render error.tsx instead of page.tsx while the rest of the UI stays intact.
Some of the naming conventions include:
layout.tsxtemplate.tsxerror.tsx(React error boundary)loading.tsx(React suspense boundary)not-found.tsx(React error boundary)page.tsxor nestedlayout.tsx
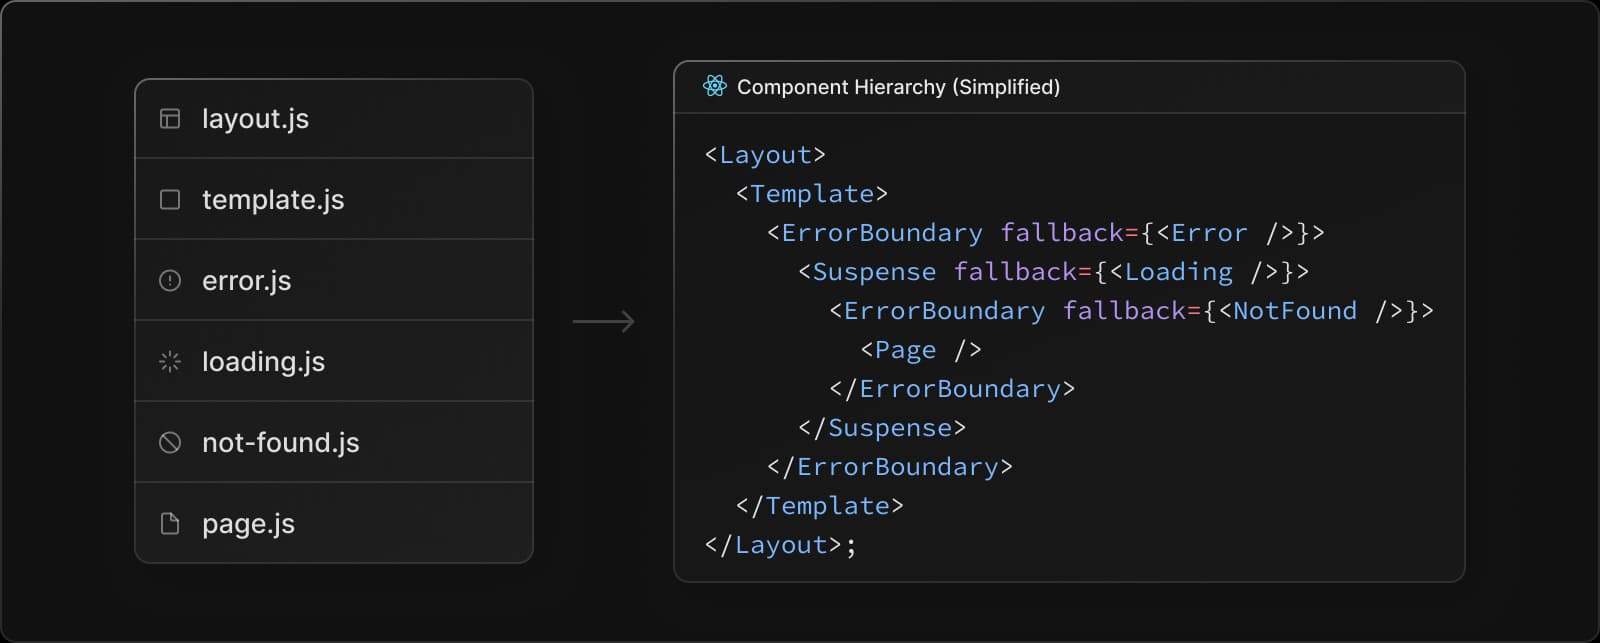
loading.tsx
This is an optional file that you can create within any directory inside of the app folder. It automatically wraps the page inside of a React suspense boundary.
The component will be shown immediately on the first load as well as when you're navigating between the sibling routes. You can pre-render loading indicators such as skeletons and spinners, or a small but meaningful part of future screens such as a cover photo, title, etc.
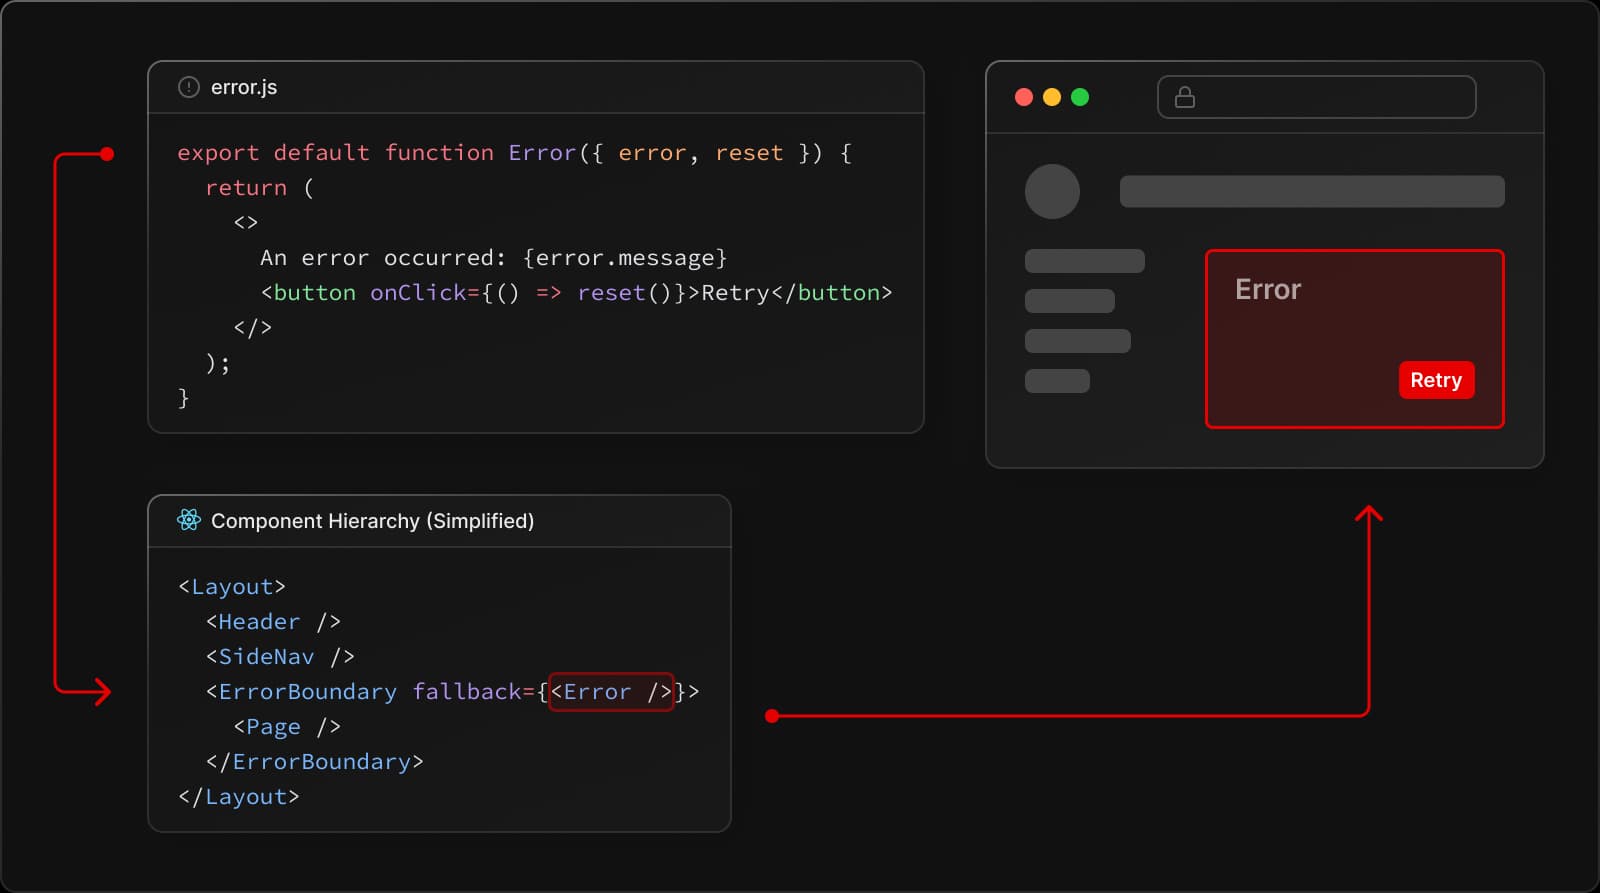
error.tsx
An optional file that isolates the error to the smallest possible subsection of the app. Creating the error.tsx file automatically wraps the page inside of a React error boundary.
Whenever any error occurs inside the folder where this file is placed, the component will be replaced with the contents of this component.
When the fallback error component is active, layouts above the error boundary maintain their state and remain interactive, and the error component can display functionality to recover from the error.
Two props are passed to this component: the error prop provides more details about the error, and the reset function resets the error boundary. This should be enough to contain the error only to the component and preserve the UI as well as the state of the rest of the application.
The nested component hierarchy has implications for the behavior of error.tsx files across a nested route. Errors bubble up to the nearest parent error boundary. This means an error.tsx file will handle errors for all its nested child segments.
More or less granular error UI can be achieved by placing error.tsx files at different levels in the nested folders of a route. An error.tsx boundary will not handle errors thrown in a layout.tsx component in the same segment because the error boundary is nested inside that layout's component.
Automatic Code Splitting
Next.js automatically performs code splitting, ensuring that only the code required for the current page is loaded. Someone who may just want to view a home page doesn't need reams and reams of JS code for your entire app.
This results in faster loading times for your app and eliminates the need for additional libraries like react-loadable or manual lazy loading.
API Routes & Data Fetching
Next.js introduces the concept of Route Handlers, enabling developers to define serverless functions that run in a Node.js environment. These serverless functions can perform backend tasks and are useful for handling calculations on the frontend or storing sensitive information like API keys securely.
You can do some neat things with these, such as revalidating static data.
When it comes to Data Fetching Strategies in Next.js, there are some strategies worth embracing. While you can fetch data in Client Components, it's generally a wise move to lean towards fetching data in Server Components, unless there's a particular client-side need.
Shifting data fetching to the server side typically amps up performance and makes users happier with a smoother experience. Plus, data fetching can take place nearer to your data source, trimming down latency, boosting performance. It's also secure by default, preventing sensitive environment variables from leaking to the client.
With Next.js, you get Automatic fetch() Request Deduping, another slick feature. You can also perform multiple data fetches with single round-trip instead of multiple individual requests on the client with this pattern.
Image Optimization
Next.js optimizes images for us automatically. It'll automatically serve images in the best format for the browser and will resize images to the size they are displayed at.
The prop layout='responsive' will serve the correct image file size based on the current browser size. This means that we don't have to worry about resizing images ourselves. For this, we use the next/image component, which is a wrapper around the HTML img tag.
Static Site Generation (SSG)
Next.js supports static site generation, allowing developers to pre-render pages at build time and serve them as static files. Incremental Static Regeneration also ensures that existing pages are updated dynamically as traffic comes in, striking a balance between static and dynamic content.
All of the components inside the app folder are server components by default, meaning you can fetch your data inside layouts, pages, and individual components. In addition to saving development time through reducing boilerplate and duplicate code, this also provides a more responsive user experience.
Partial Rendering
The Next.js router employs partial rendering, which avoids unnecessary re-rendering of unchanged segments and preserves the layout while navigating between sibling routes. It does this by re-using segments that haven't changed (e.g. shared layouts) from the client-side cache.
This leads to improved performance and a more responsive user experience.
For example, when navigating between sibling routes (e.g. /dashboard/settings and /dashboard/analytics), Next.js will only fetch and render the layouts and pages in routes that change. It will not re-fetch or re-render anything above the segments in the subtree.
This means that in routes that share a layout, the layout will be preserved when a user navigates between sibling pages.
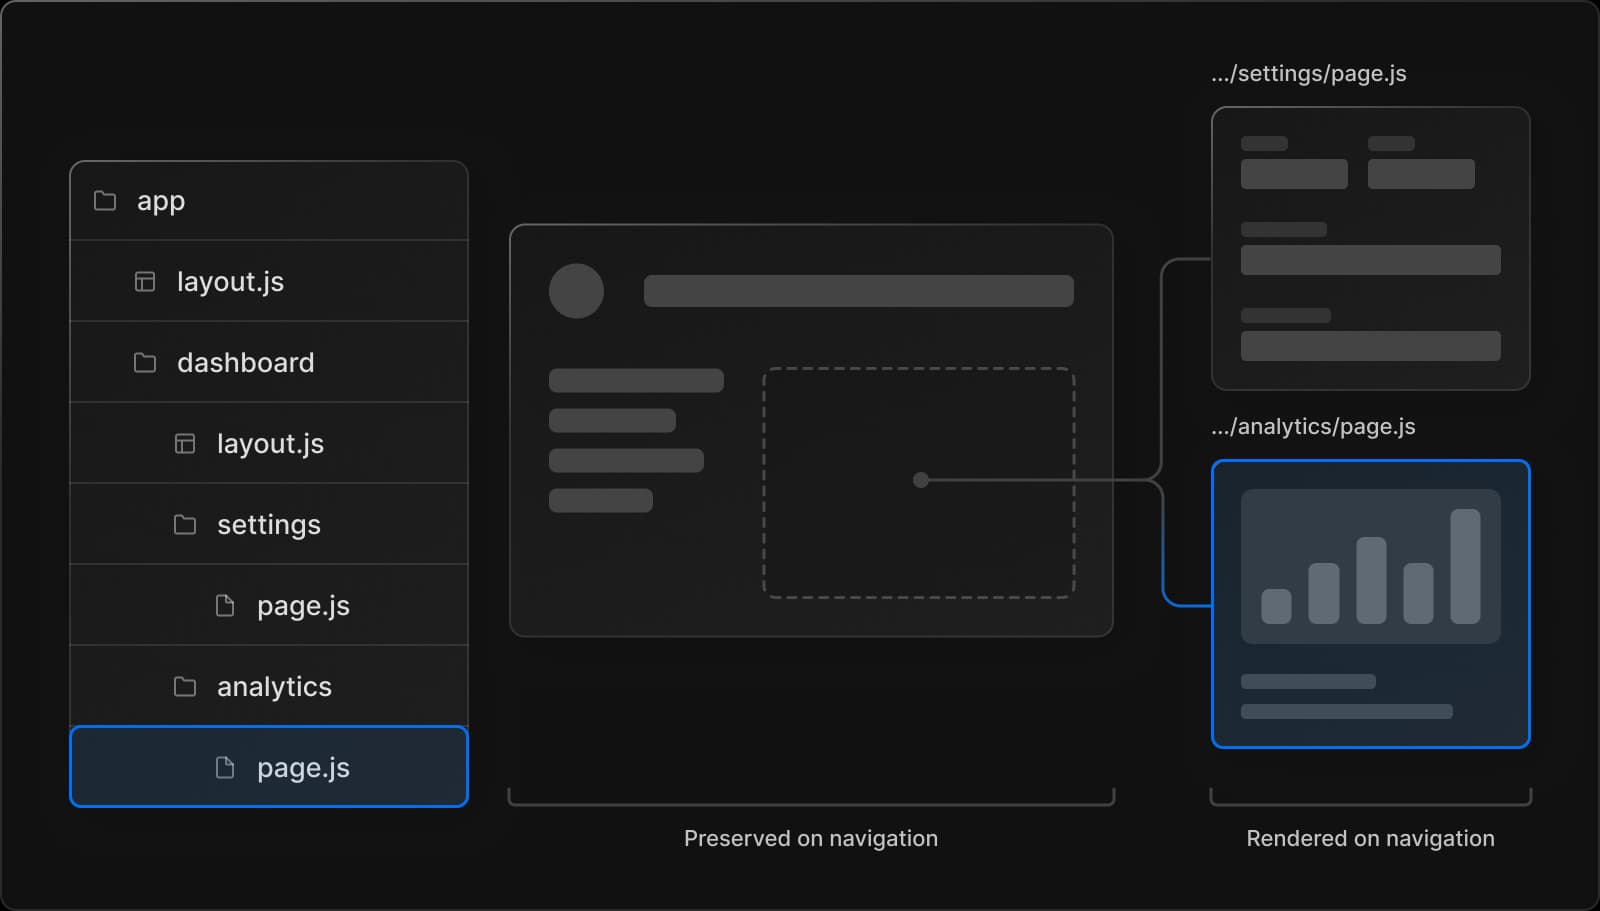
Without partial rendering, each navigation would cause the full page to re-render on the server. Rendering only the segment that's updating reduces the amount of data transferred and execution time, leading to improved performance.
If created, you can also show a loading UI from the server while the payload is being fetched.
Prefetching
Prefetching is a way to preload a route in the background before it's visited. The rendered result of prefetched routes is added to the router's client-side cache.
This makes navigating to a prefetched route near-instant.
By default, routes are prefetched as they become visible in the viewport when using the <Link> component. This can happen when the page first loads or through scrolling. Routes can also be programmatically prefetched using the prefetch method of the useRouter() hook.
Built-in SEO Support
Next.js 13 also brings significant advancements (and makes life a lot easier) in terms of search engine optimization (SEO). To define static metadata, you simply export a Metadata object from a layout.tsx or static page.tsx file:
import { Metadata } from 'next';

export const metadata: Metadata = {
  title: '...',
  description: '...',
};

export default function Page() {}
opengraph-image and twitter-image
Not only can you define simple meta data like this but you also can define OpenGraph data for your site. They are useful for setting the images that appear on social networks and messaging apps when a user shares a link to your site.
You can set Open Graph and Twitter images in two ways: Simply placing image files (.jpg, .png, .gif) in any route segment, or using code to generate images.
By default, generated images are statically optimized (generated at build time and cached) unless they use dynamic functions or uncached data. For example, opengraph-image.tsx and twitter-image.tsx are routes that default exports a function.
import { ImageResponse } from "next/server";

// Route segment config
export const runtime = "edge";

// Image metadata
export const alt = "About Acme";
export const size = {
  width: 1200,
  height: 630,
};

export const contentType = "image/png";

// Font
const interSemiBold = fetch(
  new URL("./Inter-SemiBold.ttf", import.meta.url)
).then((res) => res.arrayBuffer());

// Image generation
export default async function Image() {
  return new ImageResponse(
    (
      // ImageResponse JSX element
      <div
        style={{
          fontSize: 128,
          background: "white",
          width: "100%",
          height: "100%",
          display: "flex",
          alignItems: "center",
          justifyContent: "center",
        }}
      >
        About Acme
      </div>
    ),
    // ImageResponse options
    {
      // For convenience, we can re-use the exported opengraph-image
      // size config to also set the ImageResponse's width and height.
      ...size,
      fonts: [
        {
          name: "Inter",
          data: await interSemiBold,
          style: "normal",
          weight: 400,
        },
      ],
    }
  );
}
Robots
Add or generate a robots.txt file that matches the Robots Exclusion Standard in the root of app directory to tell search engine crawlers which URLs they can access on your site.
If you don't want to do that, you can generate a Robots file by adding a robots.ts file that returns a Robots object.
import { MetadataRoute } from 'next';

export default function robots(): MetadataRoute.Robots {
  return {
    rules: {
      userAgent: '*',
      allow: '/',
      disallow: '/private/',
    },
    sitemap: 'https://shav.dev/sitemap.xml',
  };
}
The output of which will be:
User-Agent: *
Allow: /
Disallow: /private/
Sitemap: https://shav.dev/sitemap.xml
SEO is worlds easier than plain React - we don't need the react-helmet package anymore. For example, with Next.js, we use next/head to add meta tags to the <head /> element.
Conclusion
Thinking of making the leap from React to Next.js? You're in good company, and Next.js has rolled out the red carpet for you with a treasure trove of resources.
Get into their documentation, and you'll find a bonanza of guides covering everything from data fetching and server-side components to partial rendering. And if you're more of a visual learner, there's a buffet of video tutorials and extra resources ready to guide you in harnessing the full power of Next.js.
So, here's the deal: Next.js isn't just powerful and flexible-it's a game-changer for building React applications that sing. It's packed with features that help developers like you whip up modern, streamlined, and downright enjoyable web experiences without breaking a sweat.
Ready to take your web development to the next level? Jump into Next.js and watch your projects soar!
For developers thinking of making the leap from React to Next.js, the Next.js documentation provides all the resources and guides on essential topics, such as data fetching, server-side components, and partial rendering.
In conclusion, Next.js offers a powerful and versatile framework that enhances the development process and performance of React applications. By using Next.js's extensive features, developers can create modern, efficient, and user-friendly web applications so much easier than plain React.