Shav Vimalendiran
BlogWiki ↗
  • The Last MoatsJul 7, 2026
  • The Tech FrontierJul 6, 2026
  • The Trust BarrierJul 4, 2026
  • I Open-Sourced My Coding Agents' MemoryJun 24, 2026
  • How I Gave My Coding Agents Persistent MemoryMar 12, 2026
  • Multi‑Agent Web Exploration with Shared Graph MemoryFeb 19, 2026
  • Our Lessons from Building Production Voice AIJan 11, 2026
  • Reinforcement Learning, Memory and LawDec 10, 2025
  • Automating Secret ManagementOct 23, 2025
  • The Knowledge LayerOct 5, 2025
  • OTel Sidecars on FargateSep 11, 2025
  • Git Disasters and Process DebtSep 7, 2025
  • Is Code Rotting Due To AI?Sep 3, 2025
  • The Integration IllusionAug 30, 2025
  • When MCP FailsAug 26, 2025
  • Context EngineeringAug 22, 2025
  • Stop Email Spoofing with DMARCAug 5, 2025
  • SOTA Embedding Retrieval: Gemini + pgvector for Production ChatJul 21, 2025
  • Agentic Design PatternsJun 21, 2025
  • Building AI Agents for Automated PodcastsJan 1, 2025
  • Rediscovering CursorDec 2, 2024
  • GraphRAG > Traditional Vector RAGAug 8, 2024
  • Cultural Bias in LLMsJul 20, 2024
  • Mapping out the AI Landscape with Topic ModellingJul 7, 2024
  • Sustainable Cloud Computing: Carbon-Aware AIJun 27, 2024
  • Defensive Technology for the Next Decade of AIJun 24, 2024
  • Situational Awareness: The Decade AheadJun 13, 2024
  • Mechanistic Interpretability: A SurveyJun 7, 2024
  • Why I Left UbuntuMay 24, 2024
  • Multi-Agent CollaborationApr 16, 2024
  • Building Better Retrieval SystemsMar 28, 2024
  • Building an Automated Newsletter-to-Summary Pipeline with Zapier AI Actions vs AWS SES & LambdaFeb 3, 2024
  • Local AI Image GenerationDec 15, 2023
  • Deploying a Distributed Ray Python Server with Kubernetes, EKS & KubeRayNov 15, 2023
  • Making the Switch to Linux for DevelopmentOct 24, 2023
  • Scaling Options Pricing with RayOct 1, 2023
  • The Async Worker PoolSep 23, 2023
  • Browser Fingerprinting: Introducing My First NPM PackageSep 8, 2023
  • Reading Data from @socket.io/redis-emitter without Using a Socket.io ClientJul 6, 2023
  • Socket.io Middleware for Redux Store IntegrationJul 1, 2023
  • Sharing TypeScript Code Between Microservices: A Guide Using Git SubmodulesApr 21, 2023
  • Efficient Dataset Storage: Beyond CSVsFeb 3, 2023
  • Why I switched from Plain React to Next.js 13Nov 8, 2022
  • Deploy & Scale Socket.io Containers in ECS with ElasticacheNov 3, 2022
  • Implementing TOTP Authentication in Python using PyOTPSep 13, 2022
  • Simplifying Lambda Layer ARNs and Creating Custom Layers in AWSSep 9, 2022
  • TimeScaleDB Deployment: Docker Containers and EC2 SetupJun 23, 2022
  • ›How to SSH into an EC2 Instance Using PuTTYDec 16, 2021
Loading post…

In This Post

Download PuTTY and PuTTYgenConvert .pem to .ppk using PuTTYgenConfigure PuTTY ConnectionTroubleshooting Common Issues
Published: December 16, 2021
Previous

How to SSH into an EC2 Instance Using PuTTY

If you're working with Amazon Web Services (AWS) and need to access your EC2 instances securely, PuTTY can be a valuable tool. However, PuTTY doesn't directly support the standard .pem files generated by AWS for SSH authentication. In this guide, I'll walk you through connecting to your EC2 instances using PuTTY by converting your .pem file to a .ppk file that PuTTY can understand.

Download PuTTY and PuTTYgen

To get started, you'll need to download PuTTYgen, a companion tool that converts the .pem file to a format accepted by PuTTY. This conversion is necessary because PuTTY doesn't directly accept .pem files generated by AWS.

Convert .pem to .ppk using PuTTYgen

Step 1: Launch PuTTYgen and load your .pem file generated by AWS.
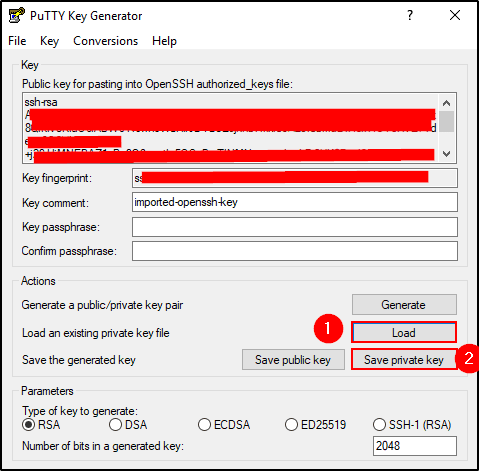
PuTTYgen interface showing the process of converting a .pem file to .ppk format

Step 2: Once the file is loaded, click on Save private key to save the private key as a .ppk file. PuTTYgen will prompt you to save without a passphrase - you can proceed safely for this conversion.

Configure PuTTY Connection

Now that we have the converted .ppk file, let's configure PuTTY to SSH into our EC2 instance.

Step 1: Open PuTTY and enter the public IP address of your EC2 instance in the Host Name field.
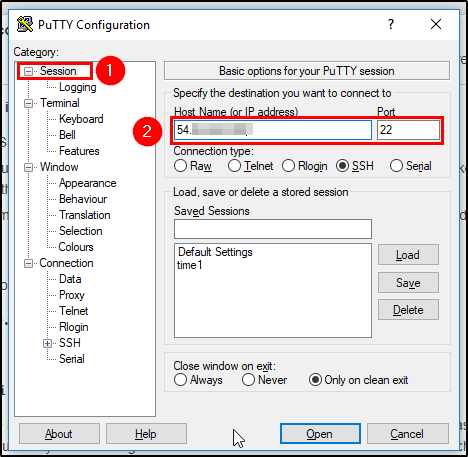
PuTTY configuration window showing where to enter the EC2 instance IP address

Step 2: Navigate to Connection > Data in the left panel and specify the username as ec2-user (this may vary depending on your AMI - Ubuntu instances use ubuntu, Amazon Linux uses ec2-user).
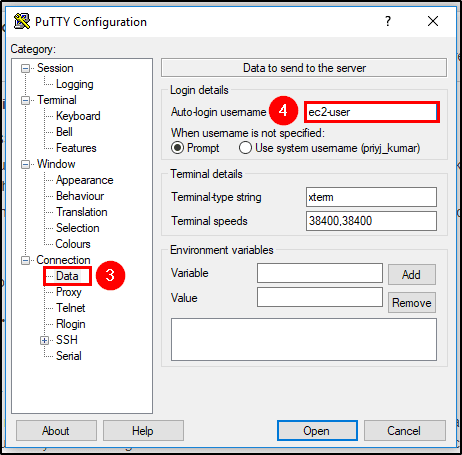
PuTTY data configuration showing where to set the auto-login username

Step 3: Navigate to Connection > SSH > Auth > Credentials and browse to select your previously converted .ppk file.
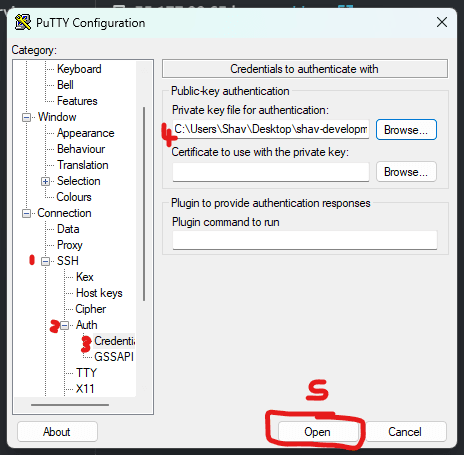
PuTTY SSH authentication settings showing where to load the private key file

Step 4: Return to the Session category, optionally save your configuration for future use, then click Open to establish the connection to your EC2 instance.

Troubleshooting Common Issues

If you encounter connection issues, verify that:

  • Your EC2 instance's security group allows SSH traffic (port 22) from your IP address
  • The instance is in a running state
  • You're using the correct username for your AMI type
  • The .ppk file was properly converted from the original .pem file

This method provides a secure way to access your AWS EC2 instances using PuTTY's familiar interface, making server management more accessible for Windows users who prefer GUI-based SSH clients.


Loading comments...
PreviousTimeScaleDB Deployment: Docker Containers and EC2 Setup

Be the first to share your thoughts!