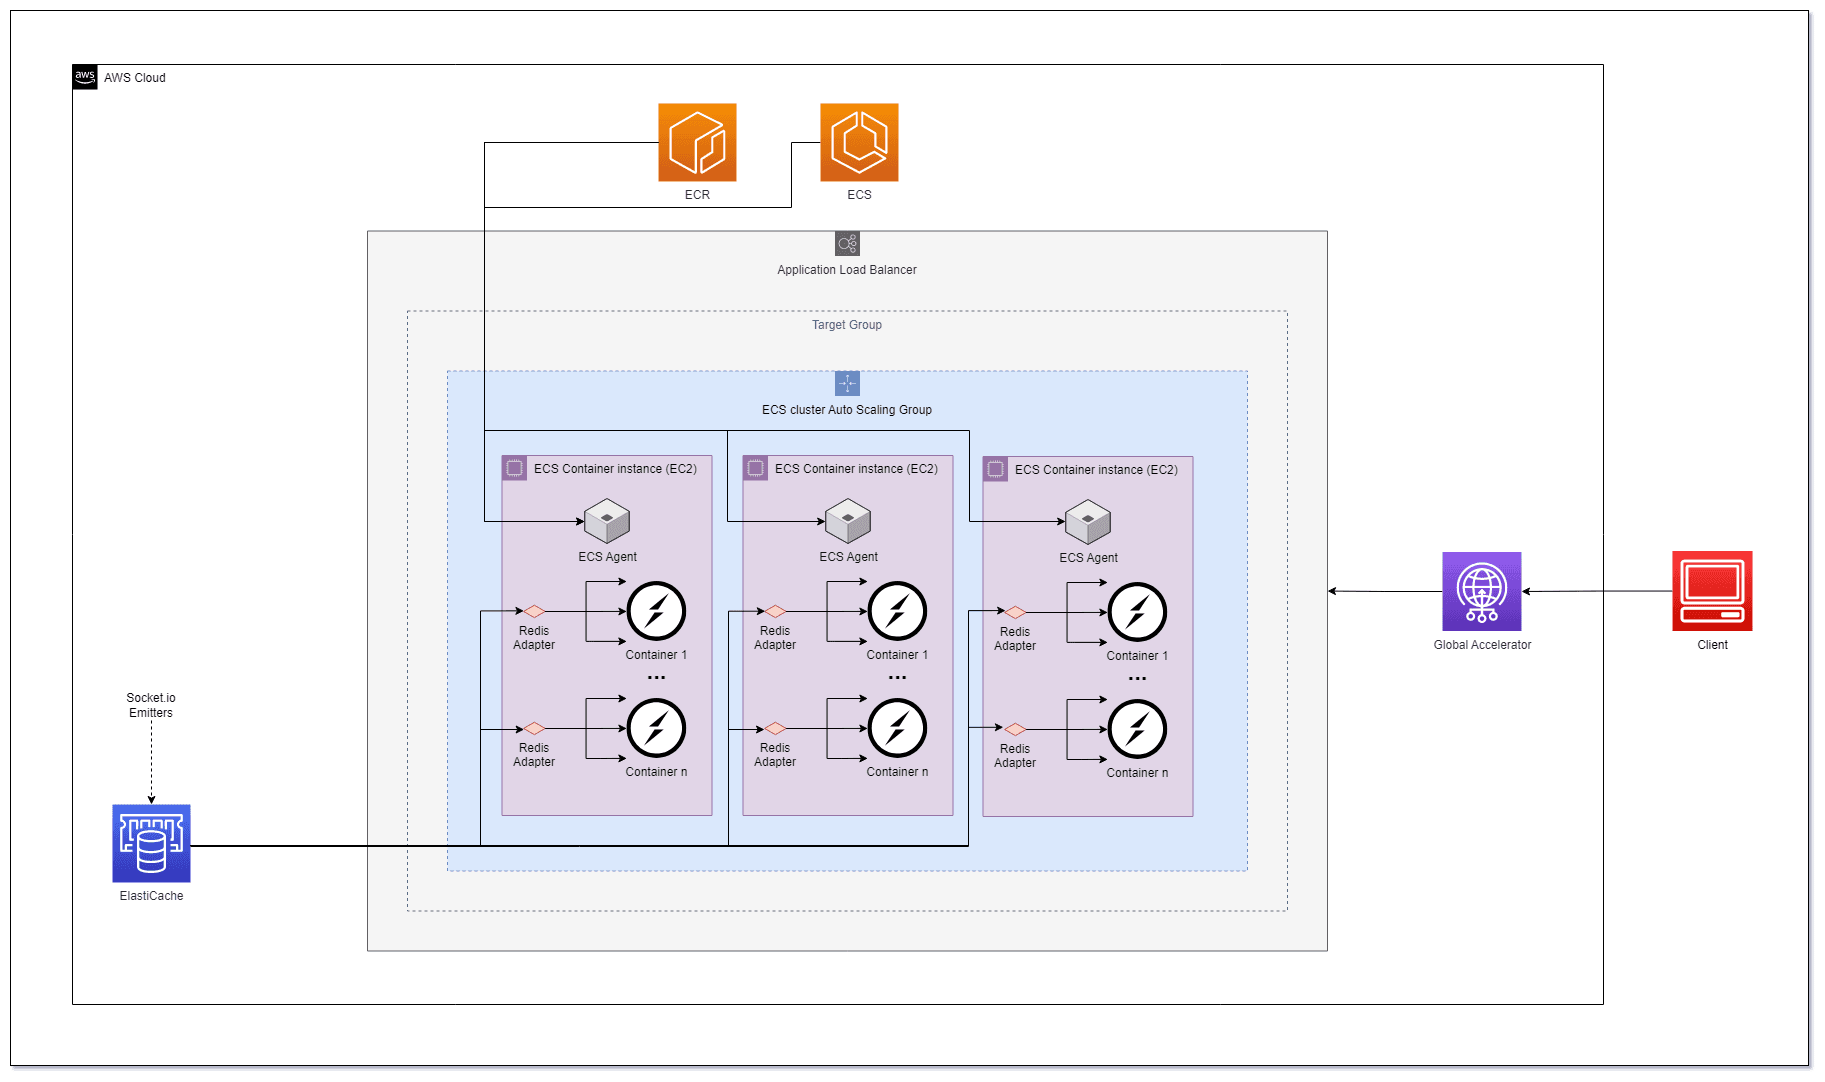
In this post, we'll explore the process of deploying and scaling a Socket.io server in Amazon Elastic Container Service (ECS) with Redis using Elasticache. Socket.io is a popular library for enabling real-time, bidirectional communication between clients and servers, making it an excellent choice for chat applications, online gaming, and other interactive services.
Socket.io Admin Dashboard
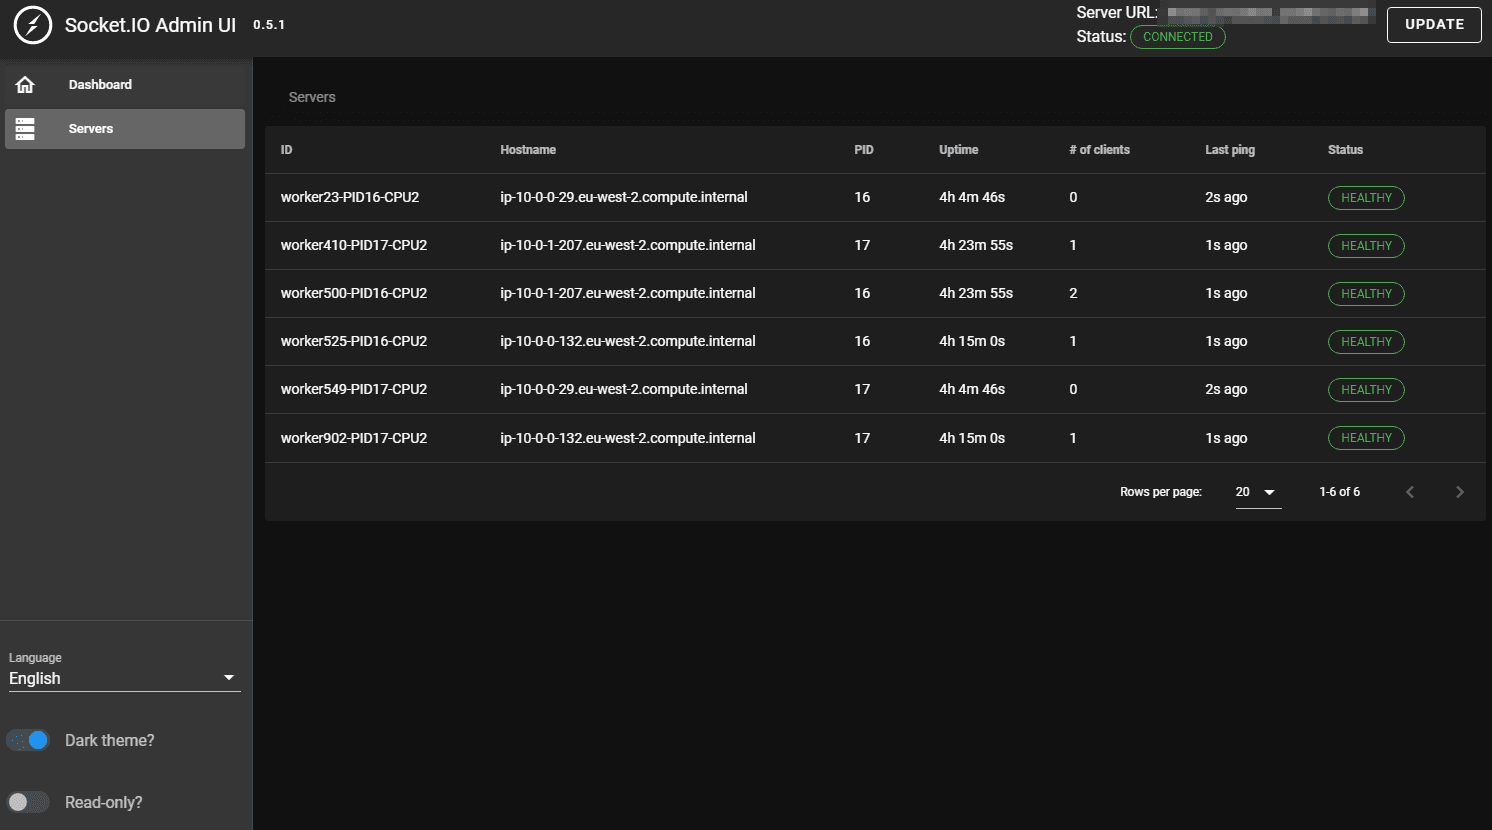
Before diving into the deployment process, let's briefly introduce the Socket.IO admin UI, which provides an overview of the state of your Socket.IO deployment. This admin UI allows you to monitor connected servers and clients. You can find the source code for the admin UI at GitHub and access the hosted version at admin.socket.io.
An overview of the servers and the clients that are currently connected:
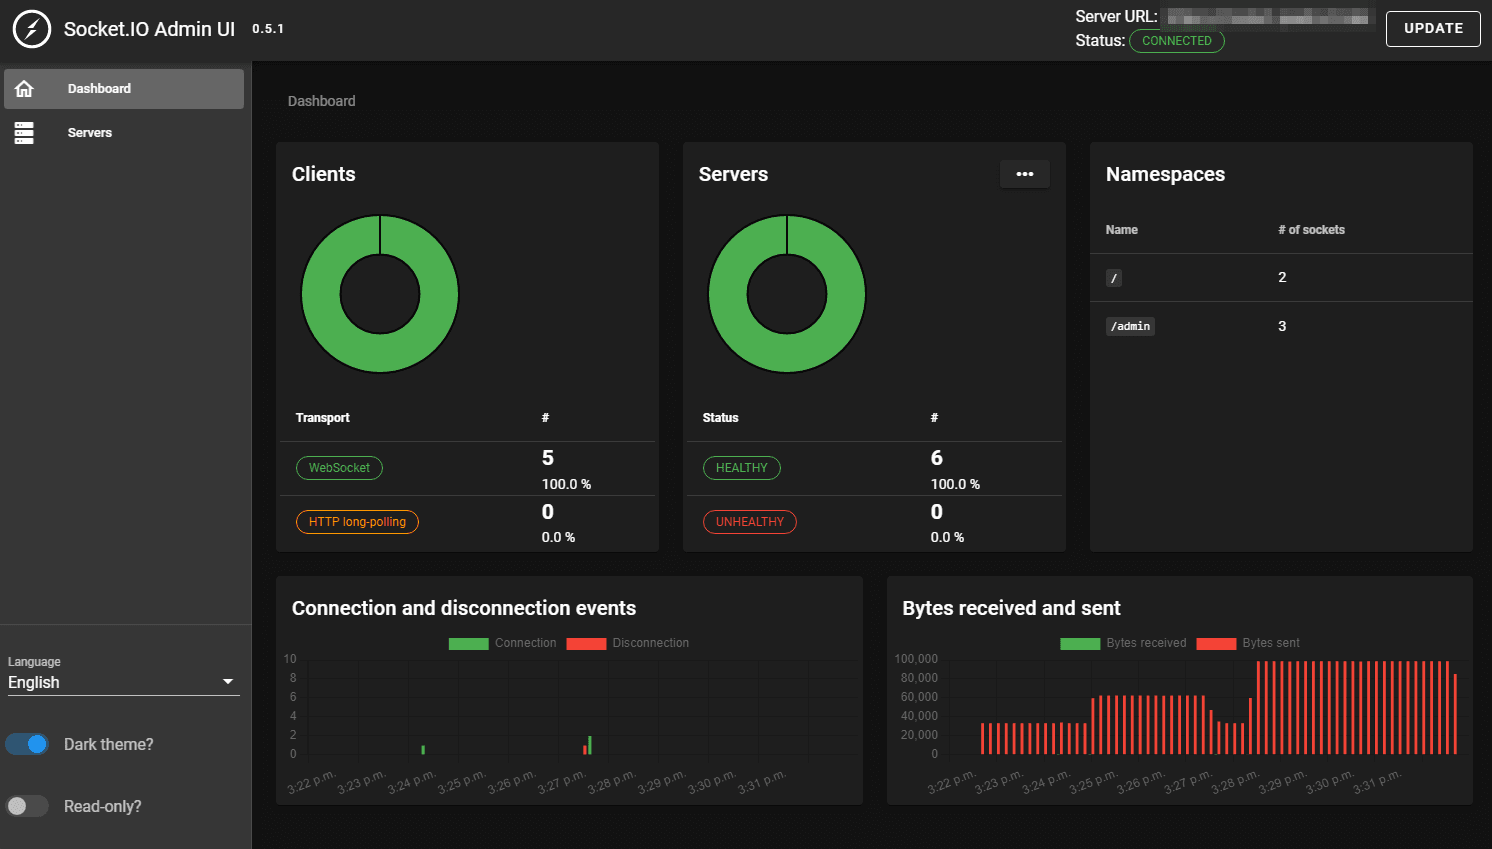
And an overview of the health of the servers:
Clustering Within Server Containers
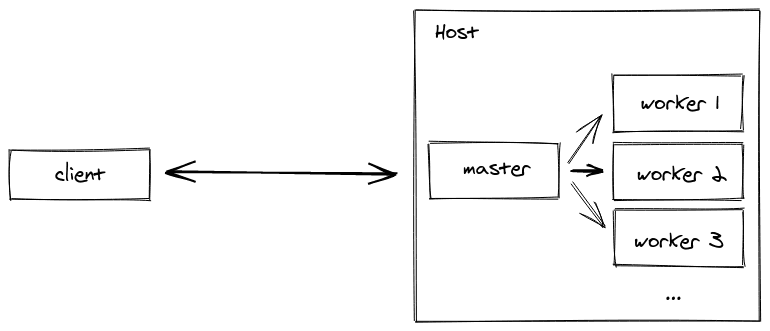
Node.js itself is actually not multi-threaded, so all of these requests are just being handled in the event loop of a single thread. To address this limitation and handle increased traffic, we can utilize clustering - this will start up multiple instances of your code to handle even more requests.
Obviously this is helpful to any app that can divide work between different processes, but it's especially important to apps that handle many I/O requests. The master process forks multiple child processes (typically one per processor), and each child process runs a separate instance of the Socket.io server. In this case, the children are allowed to share a port with the parent thanks to inter-process communication (IPC).
import cluster from 'cluster';
import { createServer } from 'http';
import os from 'os';
import { instrument } from '@socket.io/admin-ui';
import { createAdapter } from '@socket.io/redis-adapter';
import { setupMaster, setupWorker } from '@socket.io/sticky';
import { createClient } from 'redis';
import { Server } from 'socket.io';
const numCPUs = os.cpus().length;
const redisUrl = process.env.REDIS_ENDPOINT || 'redis://localhost:6379';
const socketPort = process.env.SOCKET_PORT || 3000;
const randomNumber = Math.floor(Math.random() * 1000);
if (cluster.isPrimary) {
console.log(
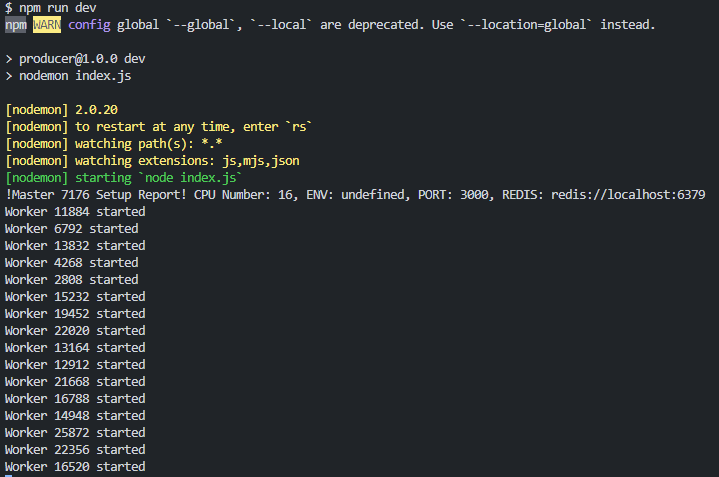
`!Master ${process.pid} Setup Report! CPU Number: ${numCPUs}, ENV: ${process.env.NODE_ENV}, PORT: ${socketPort}, REDIS: ${redisUrl}`
);
const httpServer = createServer();
setupMaster(httpServer, {
loadBalancingMethod: 'least-connection', // either "random", "round-robin" or "least-connection"
});
httpServer.listen(socketPort);
// Fork workers for CPU Number
for (let i = 0; i < numCPUs; i++) {
cluster.fork();
}
cluster.on('exit', (worker, code, signal) => {
console.log(
`worker ${worker.process.pid} died with code/signal ${
signal || code
}. Restarting worker...`
);
cluster.fork();
});
} else {
console.log(`Worker ${process.pid} started`);
// Workers can share any TCP connection
// In this case it is an HTTP server
const httpServer = createServer();
const io = new Server(httpServer, {
// fix ws and socket.io memory leak:
perMessageDeflate: false,
// CORS:
cors: {
origin: ['https://admin.socket.io', 'http://localhost:8080'],
methods: ['GET', 'POST'],
credentials: false,
allowedHeaders: ['Access-Control-Allow-Origin'],
},
});
const pubClient = createClient({ url: redisUrl });
const subClient = pubClient.duplicate();
Promise.all([pubClient.connect(), subClient.connect()])
.then(() => {
io.adapter(createAdapter(pubClient, subClient));
setupWorker(io);
instrument(io, {
auth: {
type: 'basic',
username: 'admin',
password:
'$2y$10$/KK5k7tbBPQUXa.Jguxm4uiAQG0p0WgK1swHZOxjoyfewQtA7rPsi', // encrypted with bcrypt require("bcryptjs").hashSync("xxx", 10)
},
serverId: `worker${randomNumber}-PID${process.pid}-CPU${numCPUs}`,
mode: 'production',
});
})
.catch((err) => {
console.log(err);
});
io.on('connection', (client) => {
console.log('Connected:', client.id);
client.on('join-channel', (channel) => {
client.join(channel);
// emit to all
io.to(channel).emit('tickers', `${client.id} Joined ${channel}`);
console.log('\t', client.id, 'joined:', channel);
});
client.on('leave-channel', (channel) => {
client.leave(channel);
io.to(channel).emit('tickers', `${client.id} left ${channel}`);
console.log('\t', client.id, 'left:', channel);
});
client.on('disconnect', () => {
console.log('Disconnected:', client.id);
});
});
}The functionality of the code is split up into two parts: the master code and the worker code. This is done in the if-statement (if (cluster.isPrimary) {...}). The master's only purpose here is to create all of the workers (the number of workers created is based on the number of CPUs available), and the workers are responsible for running separate instances of the Express server.
When a worker is forked off of the main process, it re-runs the code from the beginning of the module. When the worker gets to the if-statement, it returns false for cluster.isMaster, so instead it'll create the Express app, a route, and then listens on port 8080. Here we are using os.cpus().length, and since we have 16 cores on our machine, we'd have 16 workers spawned (a worker per core), all listening on the same port for requests to come in.
But how are requests divided up between the workers? Obviously they can't (and shouldn't) all be listening and responding to every single request that we get. To handle this, there is actually an embedded load-balancer within the cluster module that handles distributing requests between the different workers. On Linux and OSX (but not Windows) the round-robin (cluster.SCHED_RR) policy is in effect by default. The only other scheduling option available is to leave it up to the operating system (cluster.SCHED_NONE), which is default on Windows.
The scheduling policy can be set either in cluster.schedulingPolicy or by setting it on the environment variable NODE_CLUSTER_SCHED_POLICY (with values of either 'rr' or 'none').
You might also be wondering how different processes can be sharing a single port. The difficult part about running so many processes that handle network requests is that traditionally only one can have a port open at once. The big benefit of cluster is that it handles the port-sharing for you, so any ports you have open, like for a web-server, will be accessible for all children. This is done via IPC, which means the master just sends the port handle to each worker.
This setup ensures better utilization of CPU cores and improved performance for applications that handle numerous I/O requests.
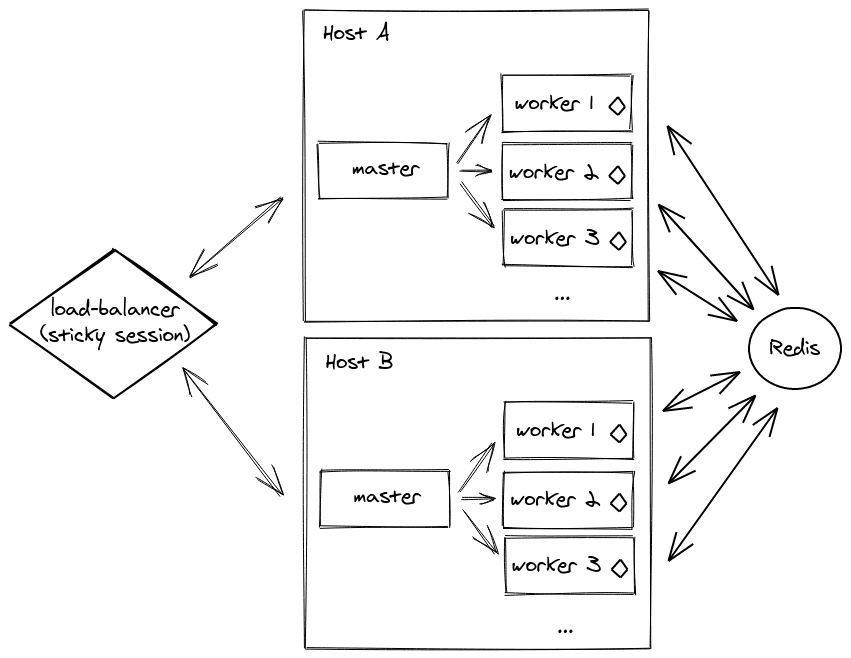
Sticky Sessions with Socket.IO
Socket.io requires sticky sessions when operating within a clustered environment to maintain session affinity. Sticky sessions ensure that all requests from a specific client are directed to the same worker process.
Traditional load balancers, like the Application Load Balancer (ALB) in AWS, can't inherently support sticky sessions for WebSocket connections. However, we can use the @socket.io/sticky package to maintain sticky sessions based on the session ID. Read more in the documentation.
Thanks to features like this, clustering is super easy.
In a multi-server setup, you will need to use another adapter, like the Redis adapter, but we will tackle this!
Other WebSocket Server Implementations
Any WebSocket server implementation which exposes the same API as ws (notably the handleUpgrade method) can be used. Starting with version 4.4.0, a Socket.IO server can now bind to a µWebSockets.js server - a C++ alternative to the Node.js native HTTP server. With this, the memory usage per WebSocket server implementation is lower for a Socket.IO server based on the µWebSockets.js package.
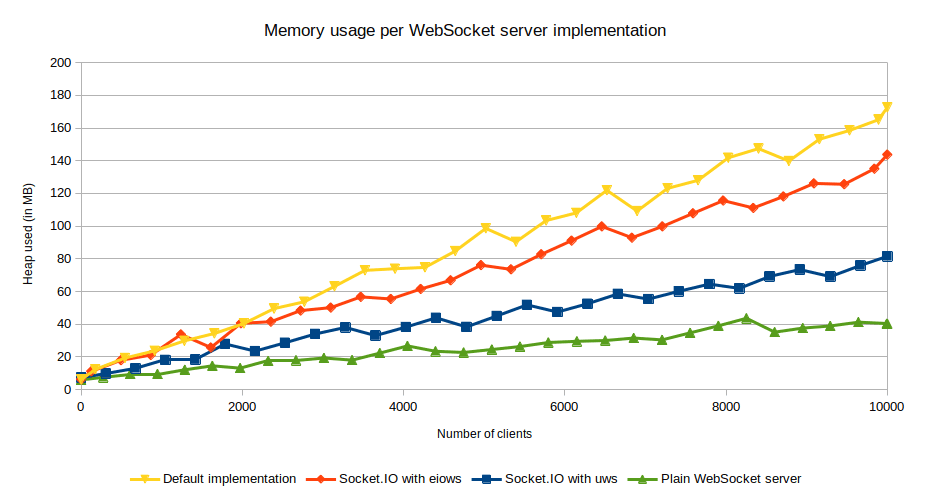
If you want to read more on this, you can refer to the following paper: performance study of JavaScript WebSocket framework as a starting point.
ECS Deployment
ECS is a container orchestration service provided on top of EC2 instances that is only compatible with Docker. ECR is a container registry in your virtual cloud that allows you to spin up a new private registry with high availability in seconds.
The deployment process involves these key steps:
- Dockerize/Containerize Socket Server - Package the application with dependencies
- Push the Docker image into ECR - Store in Amazon's container registry
- Setup the base VPC and networking/security elements - Configure subnets, security groups
- Create the Redis server in Elasticache - Add ingress to container security group
- Create the ECS cluster - Integrate Auto Scaling Group as Capacity Provider
- Create a task definition - Define container specifications and requirements
- Create Application Load Balancer and Target Group - Route traffic to container instances
- Set up Security and Sticky sessions - Configure session affinity
- Create the ECS Service - Orchestrate tasks within the cluster
- Scale cluster & service - Configure Auto Scaling for both ASG and ECS Service
Dockerize Socket.io Server and Push to ECR
To deploy our Socket.io server in ECS, we need to containerize it using Docker and push the Docker image to Amazon Elastic Container Registry (ECR). Docker provides a seamless way to package our application along with its dependencies into a container.
For the smallest builds, use a multi-stage build - where you install your modules using the full install image, but then create your app using the slim image. This can reduce the size of your final image by approximately 35MB.
Line by line:
FROM mhart/alpine-node:14 AS build      # This is the base image we are using to build the image
WORKDIR /app                            # This is the working directory for the container image
ADD package.json .                      # Copy our Package.json file into the working directory inside the container
RUN npm install                         # Install the dependencies from the package.json file in the container image
ADD . .                                 # Copy all the files from the current directory into the working directory inside the container


FROM mhart/alpine-node:slim-14          # Build stage 2, start with minimal node image withou npm
COPY --from=build /app .                # Copy the files from the build stage into the working directory in the container
EXPOSE 3000                             # Expose port 3000 to the host
CMD ["node", "index.js"]                # Run the index.js file when the container is started
If you are using TypeScript, something like this would work:
# This stage installs our modules
FROM mhart/alpine-node:16 AS build
# Create app directory
RUN mkdir -p /usr/local/app
# Move to the app directory
RUN mkdir -p /usr/local/app
WORKDIR /usr/local/app
COPY package.json ./
COPY tsconfig.json ./
COPY src ./src
RUN npm install
RUN npm run build

# Then we copy over the modules from above onto another image to reduce the size
FROM mhart/alpine-node:16 AS release
# Create app directory
RUN mkdir -p /usr/local/app
# Move to the app directory
WORKDIR /usr/local/app
COPY --from=build /usr/local/app/build .
COPY --from=build /usr/local/app/package.json .
# Omit Dev dependencies
RUN npm install --omit=dev


# Then we copy over the modules from above onto a `slim` image without npm
# You'd be reducing the image size by 40% (22MB from 54MB belong to npm and yarn in the Node 6.10 image etc.)
FROM mhart/alpine-node:slim-16
COPY --from=release /usr/local/app .
CMD ["node", "index.js"]If you're doing your npm install from your Dockerfile, then you'll probably want to add node_modules to your .dockerignore file first, so that it doesn't get sent to the docker daemon. This will speed up your build times.
After building the Docker image, we authenticate our Docker client to the ECR registry using the AWS CLI. This allows us to push the Docker image to the ECR repository.
Setting up AWS VPC and Networking Infrastructure
To prepare for deploying our Socket.io application on AWS, we need the following setup:
- VPC with Subnets - Create a VPC with subnets distributed across availability zones for high availability
- Networking for Public Subnets - Configure networking resources for public subnets, allowing containers to have public IP addresses and route network traffic through the internet gateway
- Security Groups:
- ECS Container Security Group - Allow traffic from a public-facing load balancer and between containers within the group
- Redis Cluster Security Group - Enable communication between ECS containers and the Redis cluster on port 6379
- Remove Unnecessary Rules - Clean up ingress rules, keeping only essential ones for security
Implementing Amazon Elasticache for Redis
To enable Redis functionality for our application on AWS, we will utilize Amazon Elasticache - it offers a secure and efficient managed Redis server hosted within the same VPC as our ECS containers. To establish the connection between the ECS containers and Redis, we will use an environment variable, just as we do locally with the Docker container. In the task definition, we specify the REDIS_ENDPOINT environment variable, which instructs Amazon to add the correct value when launching the Docker container in ECS.
The ECS Cluster
ECS Cluster Basics
An ECS cluster is a logical grouping of EC2 instances, also known in this context as ECS instances or container instances. These instances are spread across several availability zones. Each EC2 instance running in an ECS cluster is running an ECS container agent. The agent communicates with ECS to provide instance information and manage the containers running on its instance.
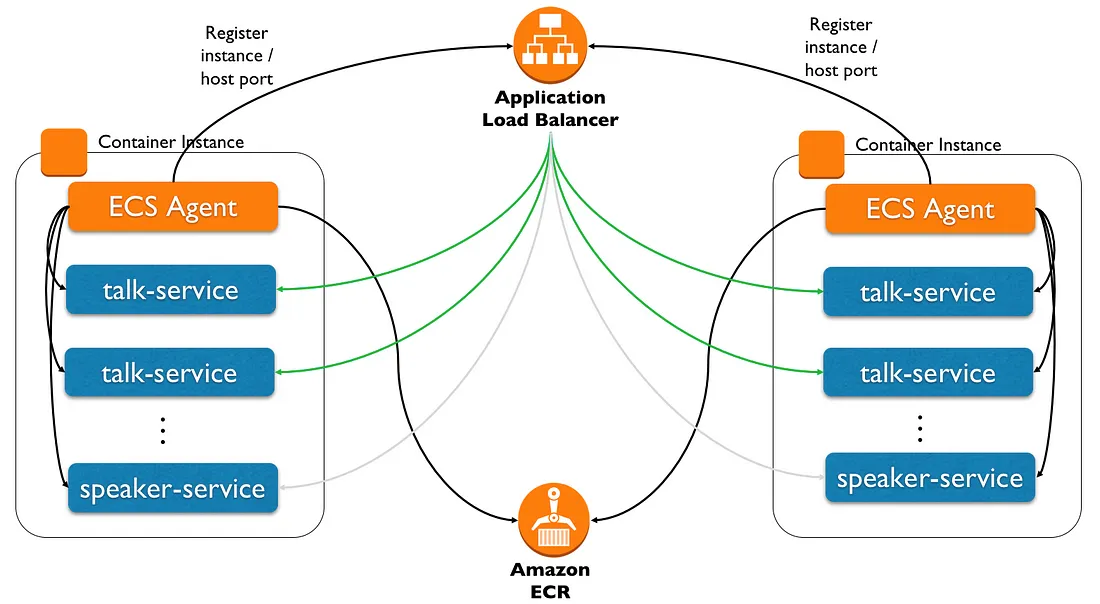
ECS can run a Task (runs until it stops/exits) or it can run a Service (a long-lived task that runs continuously). ECS will launch a new instance automatically. Services can be configured with load balancers and target groups - making them the perfect match for running web/REST applications.
We will be running services with an Application Load Balancer (ALB), so the ECS agent will also register the service, the container instance, and the assigned ephemeral port to the ALB (acting as server-side service discovery).
Keep in mind that a container instance cannot span multiple EC2 instances. For instance, if you choose t2.micro but need more memory for your container, the container will not span across several t2.micro instances. Always consider that something might go wrong during cluster execution, so you need fallback instances - typically 2 instances will be provisioned.
So we create the task and the running service based on this task definition.
Auto Scaling is used for automatic scaling up and scaling down of our capacity providers. The Application Load Balancer is used to distribute incoming traffic across multiple targets.
In summary:
- This is a logical grouping of EC2 instances (also known as ECS instances or container instances)
- These instances are spread across several availability zones
- Each EC2 instance runs 1 ECS container agent
- This agent communicates with ECS to provide instance information
- This agent also manages multiple containers running on its instance
Scaling with the ECS Cluster
How are we going to scale the application? Containers enable consistency, and we can run the same images in dev, test, and prod. AWS will help you with your high availability challenges and expansion around the world thanks to the regions available.
When you start a business or a new product, it's very hard to estimate the load. With AWS you don't have to worry about that. Just use on-demand instances when the load increases, then adapt your infrastructure to your real needs and optimize your cost with reserved instances later down the line.
We use ECS here while avoiding Fargate as it is too expensive for long-running Socket servers. We also know we will have a minimum consistent throughput, so a serverless architecture makes less sense here.
To facilitate ECS Cluster setup, we select the ECS-Optimized AMI by default. This AMI is specifically designed and optimized for ECS, providing integration with other AWS services. Additionally, we can include an SSH key pair to help us in dev for testing and debugging of the underlying EC2 instances.
Once the cluster is created, we can observe the running instances in ECS, though no tasks are running at this stage.
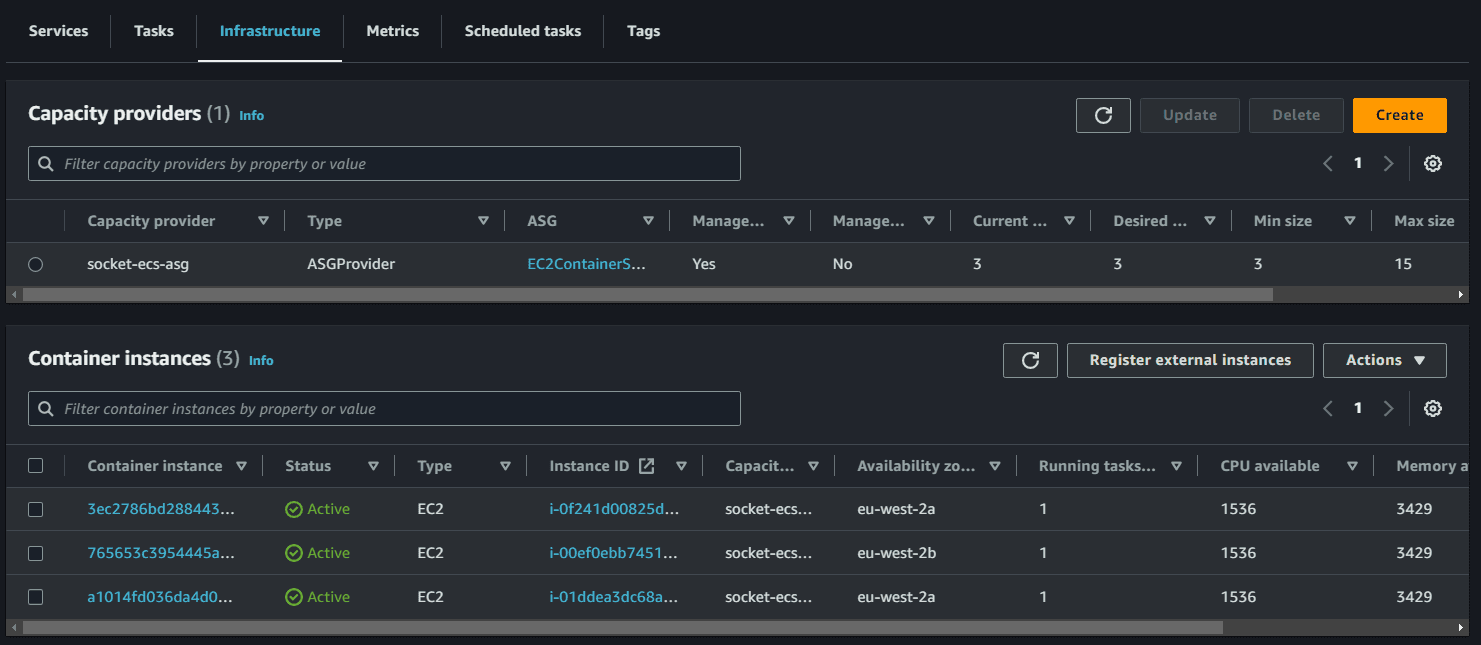
Amazon ECS can manage the scaling of Amazon EC2 instances that are registered to your cluster. This is referred to as Amazon ECS cluster auto scaling. This is done by using an Amazon ECS Auto Scaling group capacity provider with managed scaling turned on. When you use an Auto Scaling group capacity provider with managed scaling turned on, Amazon ECS creates two custom CloudWatch metrics and a target tracking scaling policy that attaches to your Auto Scaling group. Amazon ECS then manages the scale-in and scale-out actions of the Auto Scaling group based on the load your tasks put on your cluster.
To ensure successful registration of the EC2 instances with our ECS cluster, we include the following user data in the launch configuration:
#!/bin/bash
echo ECS_CLUSTER=socket-ecs-cluster >> /etc/ecs/ecs.config;echo ECS_BACKEND_HOST= >> /etc/ecs/ecs.config;
The Task Definition
Next, we create a task definition - it is just a simple metadata description of our Socket.io Docker image and its resource requirements (CPU and memory). We also define the environment variables and the container port on which our Socket.io server is listening.
Once our Docker image is available on our ECR registry, we can create a task definition using this image. Simply give a name to the task definition, specify the target image, tune the CPU and memory reservation, add the environment variables & the container port on which your image is listening.
ASG will control the ephemeral ports; note that when you don’t specify the host port (hostPort) or set it to 0, the container will automatically receive a port in the allowed ephemeral port range. It allows running several containers on the same ECS instance without conflict.
A simple one may look like:
{
  "family": "Socket",
  "containerDefinitions": [
    {
      "name": "socket-container-service",
      "image": "xxx.eu-west-2.amazonaws.com/xxx",
      "cpu": 512,
      "memoryReservation": 512,
      "portMappings": [
        {
          "containerPort": 3000,
          "hostPort": 3000,
          "protocol": "tcp"
        }
      ],
      "essential": true,
      "environment": [
        {
          "name": "REDIS_ENDPOINT",
          "value": "redis://red-xxx.cache.amazonaws.com:6379"
        }
      ],
      "mountPoints": [],
      "volumesFrom": [],
      "dockerLabels": {},
      "logConfiguration": {
        "logDriver": "awslogs",
        "options": {
          "awslogs-group": "production-service-Socket",
          "awslogs-region": "eu-west-2",
          "awslogs-stream-prefix": "Socket"
        }
      }
    }
  ],
  "taskRoleArn": "arn:aws:iam::xxx",
  "executionRoleArn": "arn:aws:iam::xxx",
  "networkMode": "awsvpc",
  "requiresCompatibilities": ["EC2"]
}
Configuring Application Load Balancer and Target Group
Now we have an empty cluster with provisioned ECS instances and a task definition describing a Docker image to run. Before creating the running service based on this task definition, we will set up an Application Load Balancer (ALB) and a Target Group in order to balance the load across possible various services instances.
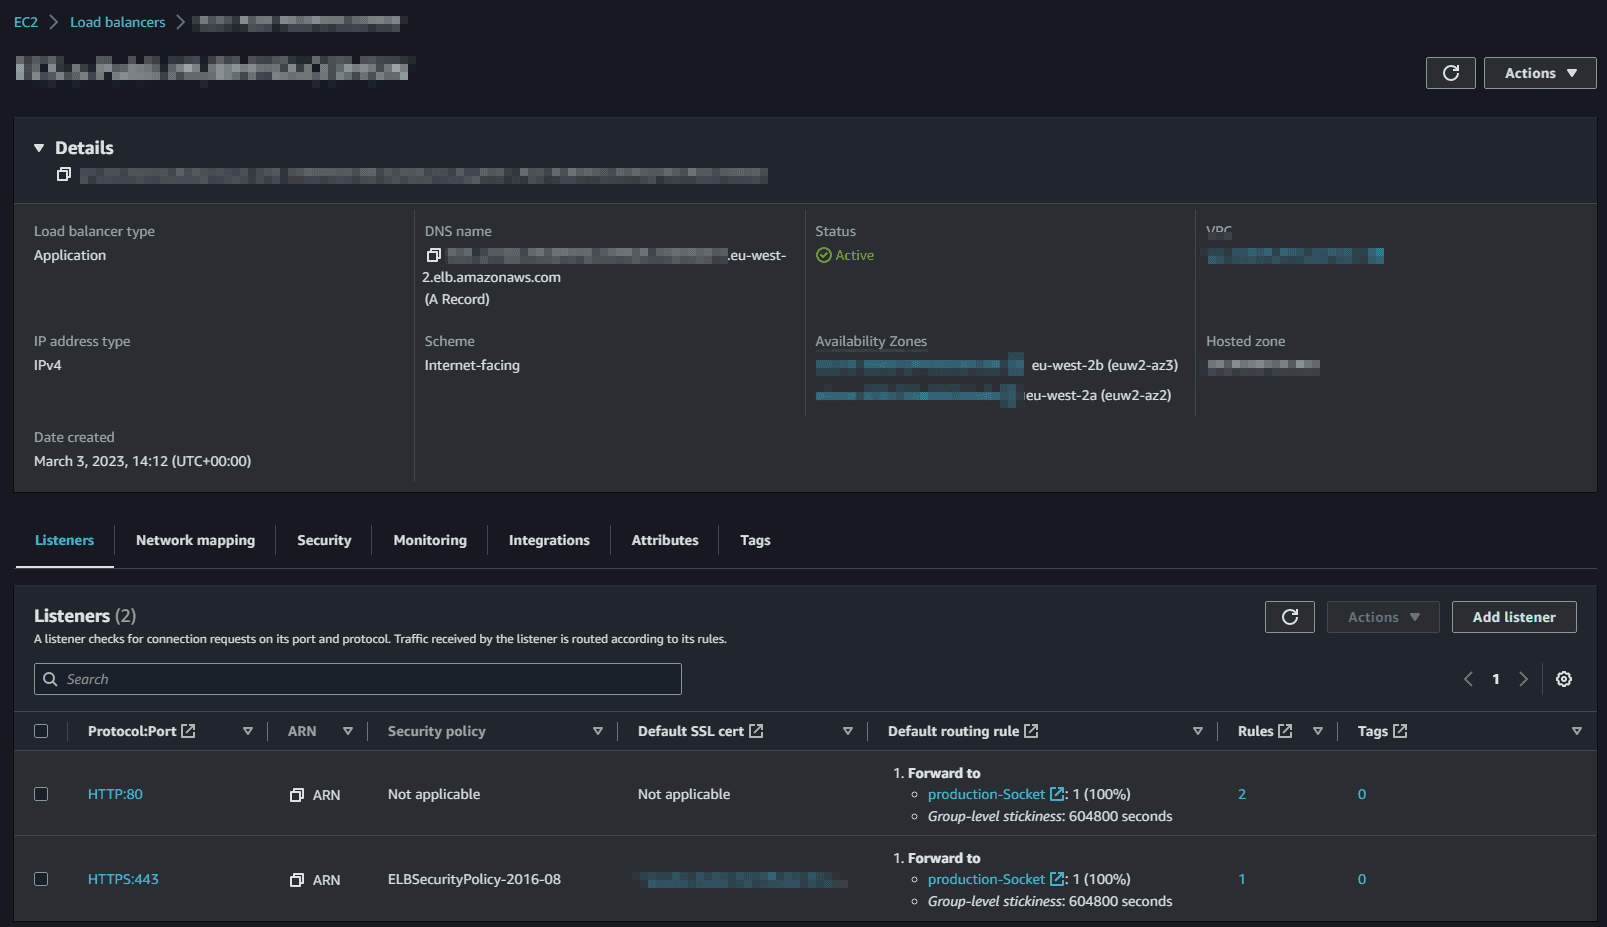
The load balancer is placed into the public subnets, so that traffic from the internet can reach the load balancer directly via the internet gateway. We also add a HTTPS listener with SSL cert to the load balancer so we can deploy it to a certain domain.
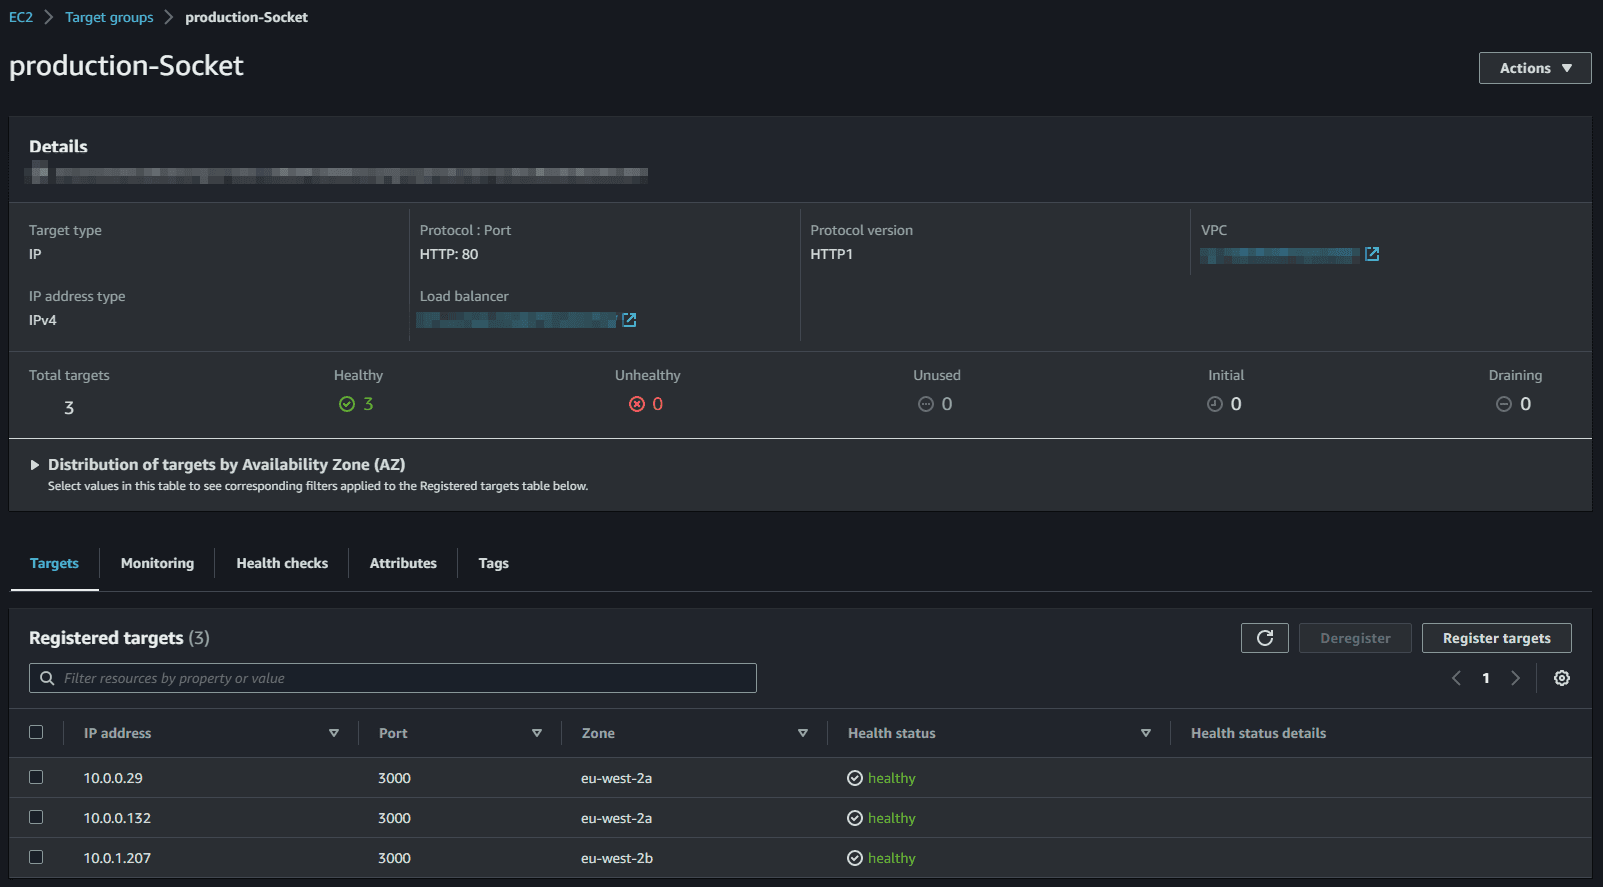
The target group is used for keeping track of all the tasks, and what IP addresses / port numbers they have. You can query it yourself, to use the addresses yourself, but most often this target group is just connected to an application load balancer, or network load balancer, so it can automatically distribute traffic across all the targets.
We Create rules to forward HTTP traffic to the service's target group. Enable autoscaling for this service by Create scaling policies for the service
One more step for this application to work properly is to configure the load balancer to use sticky sessions. This is necessary because socket.io makes one request to set a connection ID, and a subsequent upgrade request to establish the long lived websocket connection. These two requests must go to the same backend process, but by default the load balancer will send the two requests to random processes, so the connection will be unstable. We can fix this by setting the stickiness.enabled flag on the target group for the service.
If we want a secure domain for out ALB endpoint. We then go to Route 53 to create a CNAME record for the ALB. We then go to the ALB and create a listener for port 443 and attach the SSL certificate.
We also need to specify how to ensure the instance is still up for the health checks. By default, the Socket.IO server exposes a client bundle at /socket.io/socket.io.js. We can use this endpoint for the HTTP health checks to perform GET requests to this configured path.
When creating the ALB, AWS Console proposes you to register targets. Ignore this step as ECS will do it for you automatically.
Once set up, we can see all our container instances in the target group:
We forward traffic to this target group using the ALB listener:
Notes on Cloudfront:
If you want to put CloudFront in front of the load balancer you need to enable one other setting for this to work properly. By default CloudFront does not forward cookies from the client to the backend, but the ALB stickiness operates by using a cookie, so you need to go to the settings and change the “Forward Cookies” setting to “All”
This will allow the traffic from clients to be properly forwarded through CloudFront, to the Application Load Balancer, and finally to multiple running copies of the socket.io server on the backend.
The ECS Service
The service is a resource which allows you to run multiple copies of a type of task, and gather up their logs and metrics, as well as monitor the number of running tasks and replace any that have crashed. Create an ECS service and attach these tasks to the target group/load balancer previously created.
Sine we selected an SSH key pair during the ECS cluster creation, you should be able to connect the ECS instances and run docker ps to list the running containers.
We can also configure Task Placement - this lets you customize how tasks are placed on instances within your cluster. Different placement strategies are available to optimize for availability and efficiency. We use the AZ balanced spread - this template will spread tasks across availability zones and within the Availability Zone spread tasks across instances.
Notes on Scaling
ALB is very interesting for those running micro-services as a single ALB instance is able to manage several target groups/micro-services. Also, when a service instance is added/removed, the target group and the ALB detect the change almost instantly.
Also we can add different paths to our ALB to route traffic to different services. We can run up a seperate service, and set them up as a different target group managed by ECS. Both are running on the same port (80) and take advantage of path-based routing to route the traffic to the right micro-service.
ECS should scale based on 2 variables: the number of EC2 instances and the number of running services/tasks on these instances. Overall, there are two types of scaling here:
- Cluster scaling: the number of ECS instances providing computing power to our cluster i.e the compute power of our capacity provider
- Service scaling: the number of containers running for a particular service/task definition in the cluster
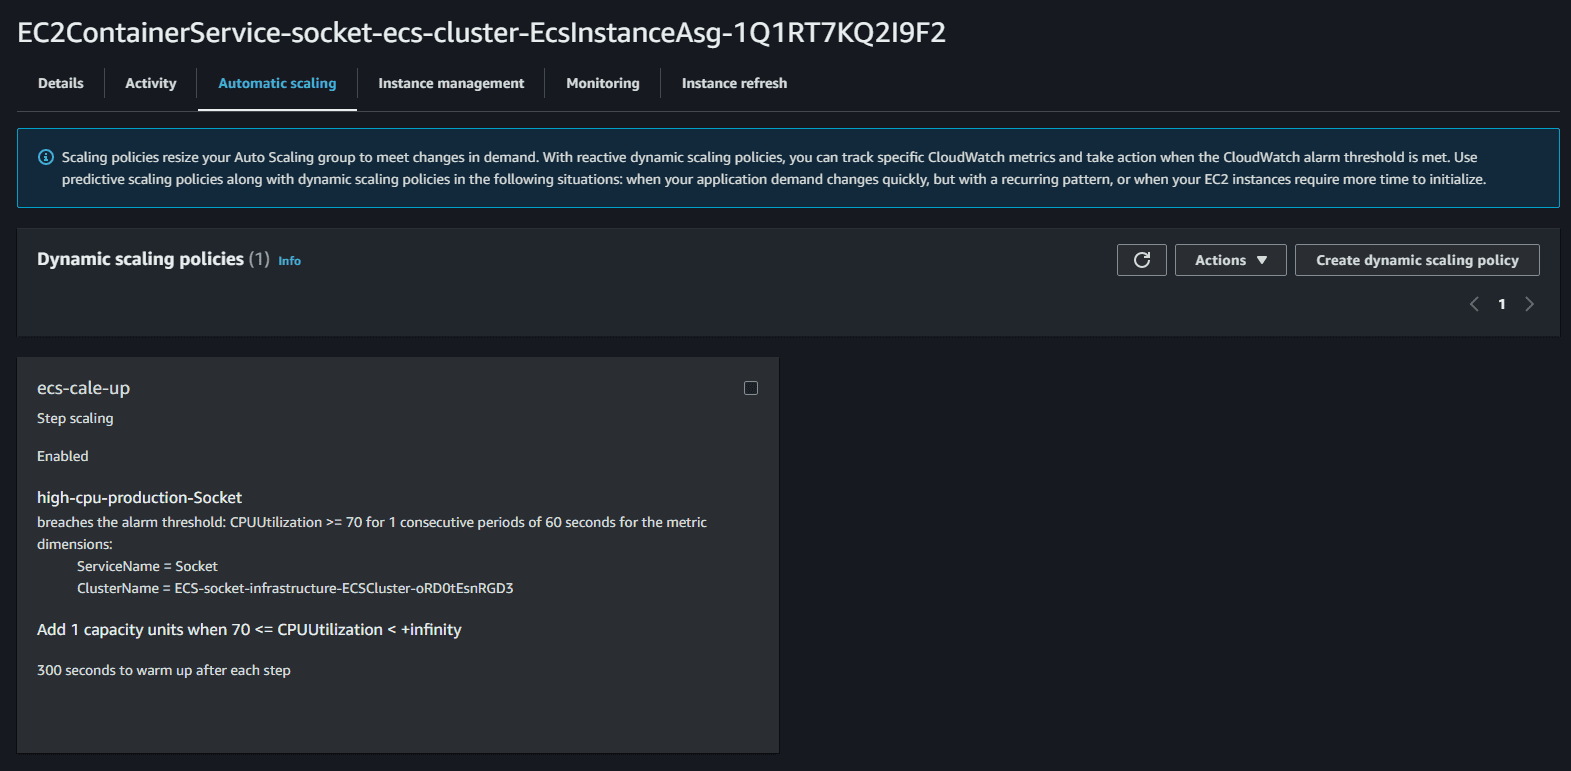
For cluster scaling, we can add policies in the automatic scaling tab of our ASG. For instance, we can add a policy to scale up the cluster when the CPU utilization is above 70% for 5 minutes. As load increases on the service and CPU usage increases the application will automatically scale up and run more instances of itself,
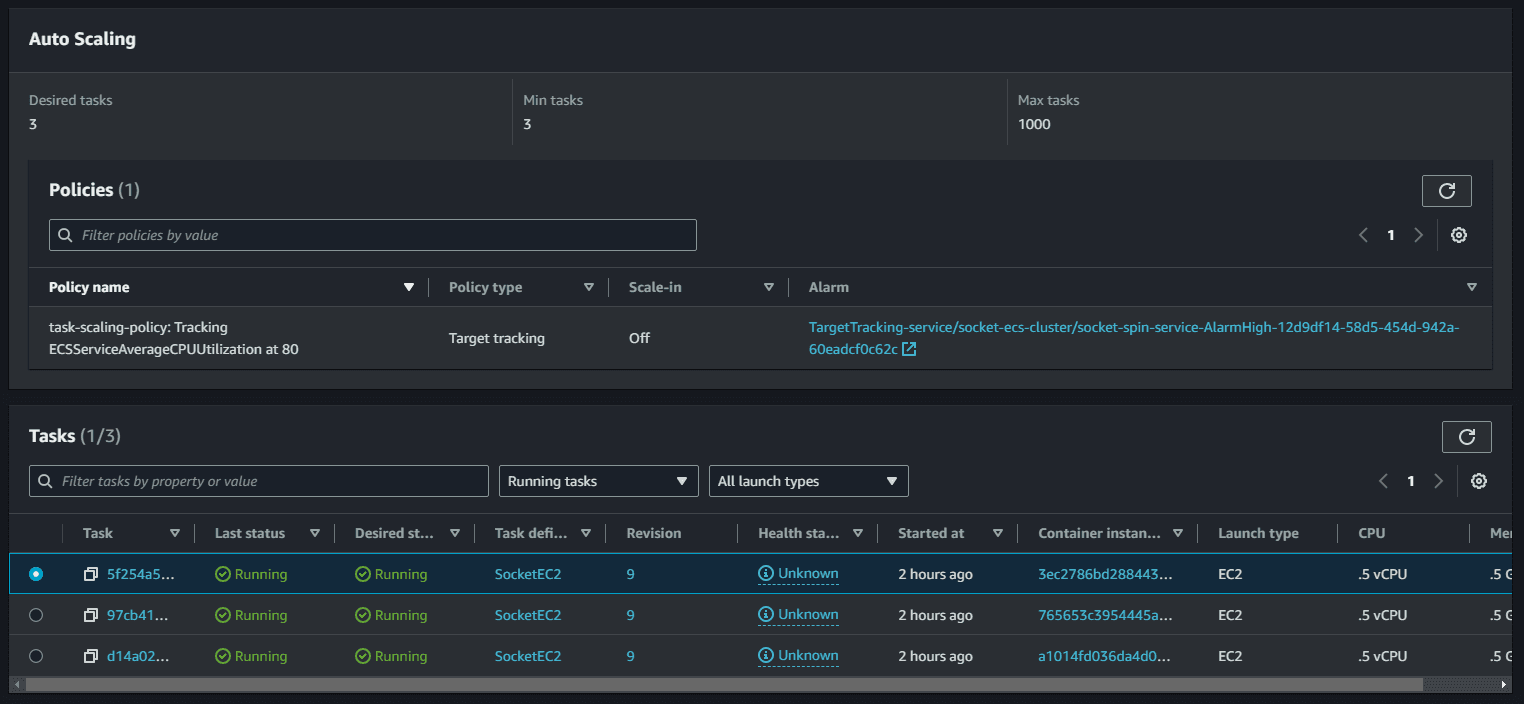
we should apply the same principles on the ECS services with Service auto scaling. This will automatically adjust your service's desired count up and down within a specified range in response to CloudWatch alarms. You can modify your service auto scaling configuration at any time to meet the needs of your application.
Blue/Green Deployment
In a blue/green deployment, you can launch the new version of your application alongside the old version and test the new version before you reroute traffic. You can also monitor the deployment process and rapidly roll back if there is an issue.
Blue/green deployment is a classical pattern for zero downtime deployment and to reduce the risk of each deployment. The blue version (version n) is currently used by your clients, and the green version (version n+1) is the new version of your application.
Once you are satisfied with the green version, you can reroute the traffic to the instance(s) of the green version. If something goes wrong, you can quickly revert your changes and reroute the traffic back to the blue version (also known as fast rollback).
With ECS, you can run the green version of your application on the same cluster as the blue version. Each version will have its own target group. If needed (and enabled), the cluster will auto-scale by adding ECS instances.
Once both versions are up and running, you can reconfigure the application load balancer to switch the traffic from blue to green and vice versa. Once switched to the new version, you can continue to run the previous one for safety reasons during several days. Then you disable the old version of the service, and after a few moments the cluster will scale-in the number of ECS instances.
Conclusion
By deploying and scaling Socket.io server containers in Amazon ECS with Elasticache, we can handle real-time communication for chat applications, gaming platforms, and more. AWS provides the flexibility and scalability to handle varying workloads and ensure a seamless user experience.
With features like clustering, sticky sessions, and blue/green deployments, we can enhance the reliability and performance of our Socket.io application while maintaining high availability and scalability.
Future Improvements
To further optimize our Socket.io deployment, we can consider implementing:
- Global Accelerator - To reduce latency and improve performance across regions
- CI/CD Pipeline - For quicker and easier iterations on the application
Remember that optimizing cost with reserved instances is always a consideration, and monitoring and fine-tuning resources as the application evolves is crucial for optimal performance.
References
- Arnaud Koster: "How to deploy and scale your app in minutes with containers and AWS ECS", Medium, 2023
- AWS Containers Team: "Building a Socket.io chat app and deploying it using AWS Fargate", Medium, 2023
- AWS Containers Team: "Scaling a realtime chat app on AWS using Socket.io, Redis, and AWS Fargate", Medium, 2023
- AWS Containers Team: "Making my Socket.io chat app production ready with Vue.js, DynamoDB, CodePipeline, and CodeBuild", Medium, 2023
- Nathan Peck: "Socket.io Chat Fargate Repository", GitHub, 2023
- AWS CodePipeline Team: "Tutorial: Create a pipeline with an Amazon ECR source and ECS-to-CodeDeploy deployment", AWS Documentation, 2023
- Diva Portal: "Performance study of JavaScript WebSocket framework", Research Paper, 2021
This article was inspired by the fantastic work of the community and the AWS ecosystem. Special thanks to the authors of these articles mentioned in the resources section for their valuable insights and contributions :)