Automation has become a key part of enhancing online engagement without demanding continuous manual intervention. This post explores creating an automated system that utilizes Zapier and Telegram to transform newsletters landing in our Gmail account into AI-generated summary threads - a process designed to operate autonomously, 24/7.
Update 22-02-2024: Unfortunately, Zapier now keeps multi-step zaps behind a paywall 😔, so later in this post I rebuild my Newsletter summarization pipeline myself in AWS!
Automation Triggers with Gmail
In Zapier, Gmail stands as our starting point. By selecting Gmail from the Apps section and connecting your account, you can use it as the trigger for the Zap. Any new email (i.e. newsletter) hitting the inbox will now be specifically triggering this automation.
Gmail Workaround: Sub-Zaps
While integrating Gmail with Zapier, you may encounter an issue, particularly when involving OpenAI. Gmail's stringent data policies means you may encounter this notification:
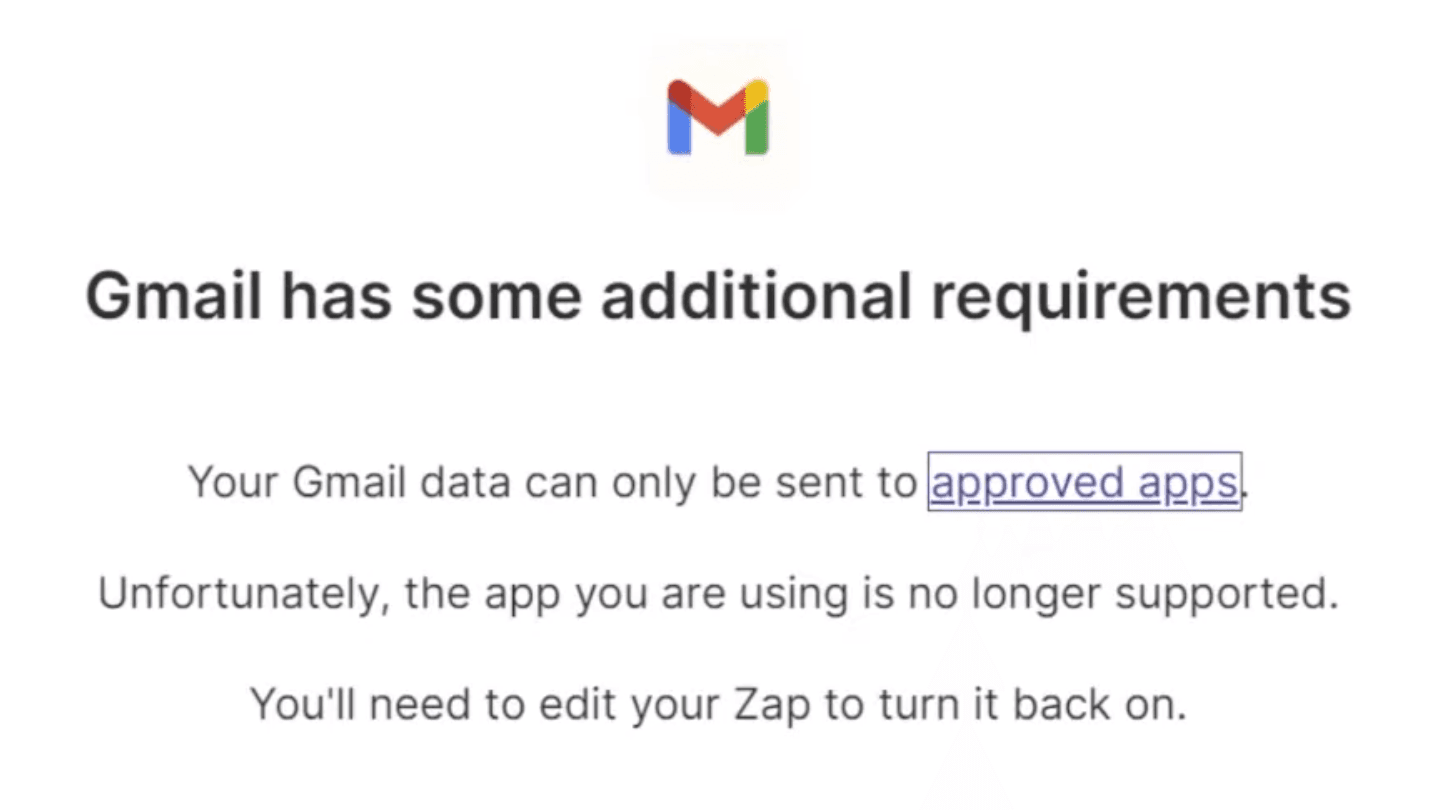
"Gmail data can only be sent to approved apps. Unfortunately, the app you are using is no longer supported. You'll need to edit your Zap to turn it back on."
Faced with limitations, the solution lies in splitting the automation into two segments using Sub-Zaps. This workaround allows us to transfer email content to a Sub-Zap that performs the OpenAI processing. Once processed, the data flows back into the main automation stream, ready for Telegram.
Initial Automation
The first part of this automation is extracting the raw body text of the email content when triggered and forwarding it to the Sub-Zap.
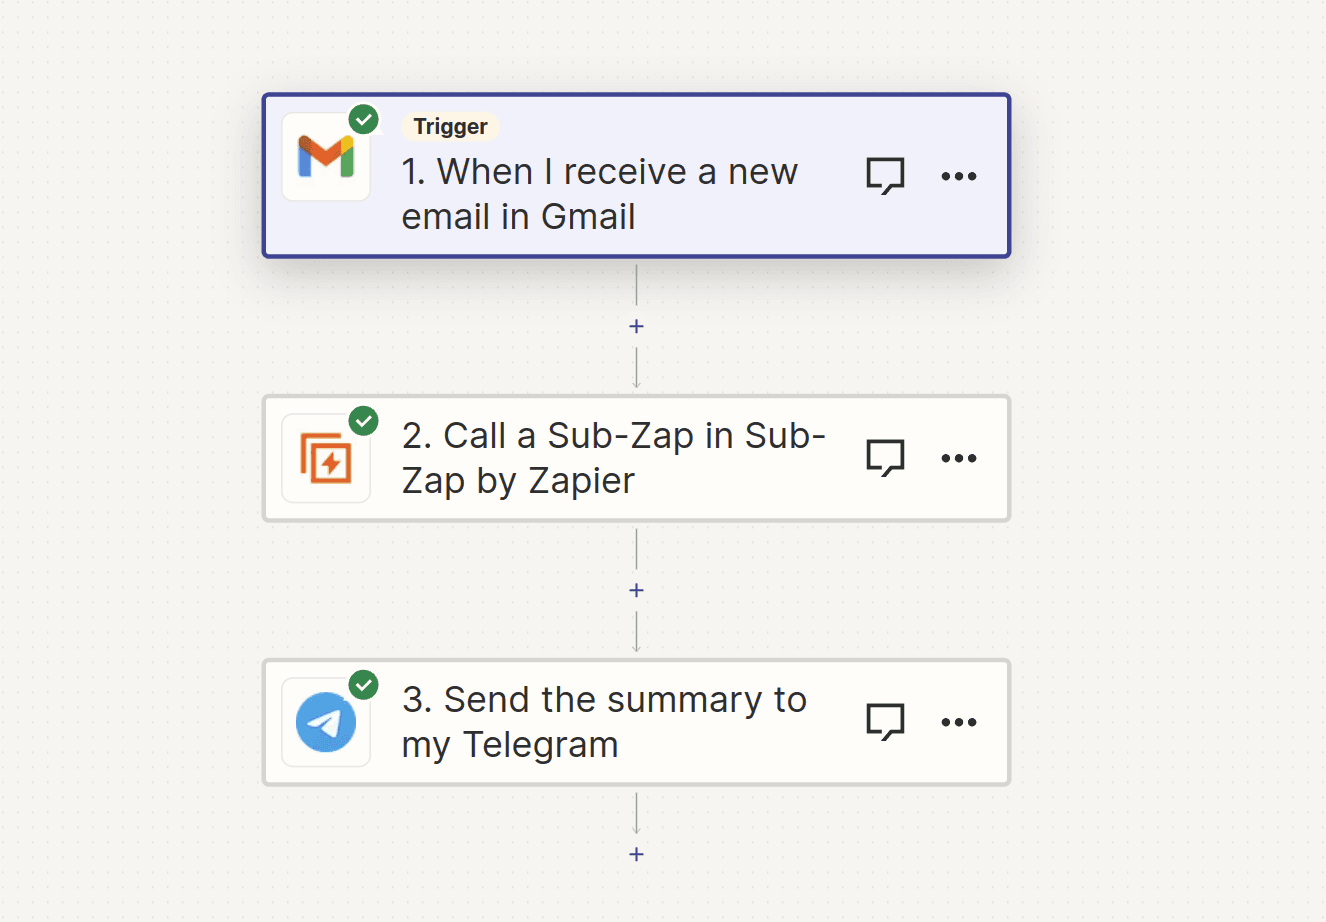
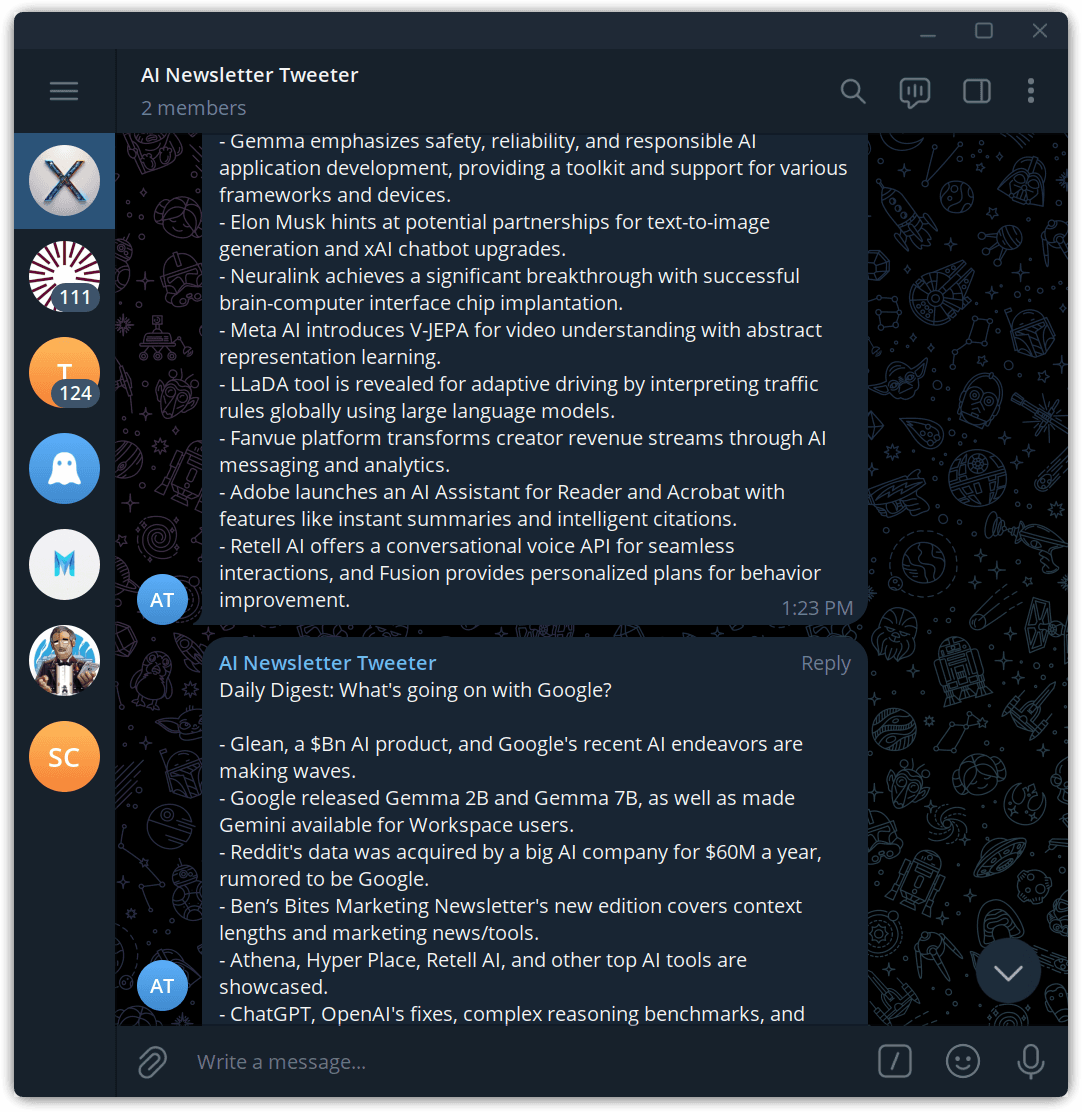
Once the result from the sub-zap is ready, it comes back and is sent to our own telegram group.
Setting up a Telegram Bot
Setting up a Telegram bot to send messages to your group is a straightforward process:
-
Create Your Telegram Bot
- Open the Telegram app and search for
@BotFather - Start a chat with
@BotFatherand type/newbotor choose the/newbotcommand from the options provided - You'll be asked a couple of questions:
- Bot Name: This can be anything you like. It's the name that will appear in your bot's contact details. For instance, "AI Newsletter Tweeter"
- Bot Username: This needs to end in
_botand can only include letters, numbers, or underscores. For example,ai_newsletter_tweeter_bot
- After you answer these questions,
@BotFatherwill give you a token, which looks something like1234567890:xxx...x. Keep this token safe and secret
- Open the Telegram app and search for
-
Add Your Bot to a Telegram Group
- Create a new group in Telegram and add the bot you just created
-
Find Your Group's Chat ID
- Send any message to your group
- Replace
ai_newsletter_tweeter_botin the following command with your bot's username and send this command to your group:/my_id @ai_newsletter_tweeter_bot - To find your group's chat ID, you need to visit a URL in your web browser. Replace
{HTTP_API_TOKEN}with your bot's token in this URL:https://api.telegram.org/bot{HTTP_API_TOKEN}/getUpdates - Look for the "chat_id" in the results. It will have a minus sign in front of it, indicating it's a group chat ID. If you don't see any results, send another message to your group and try again
-
You're All Set
- Now that you have your bot set up and your group chat ID, you can start sending messages to your group through your bot
- For sending messages, use the following URL format, replacing
{HTTP_API_TOKEN},{CHAT_ID}, and{MESSAGE_TEXT}with your token, your group chat ID, and the message you want to send, respectively:https://api.telegram.org/bot{HTTP_API_TOKEN}/sendMessage?chat_id={CHAT_ID}&text={MESSAGE_TEXT}
-
Use Your Bot with Zapier Automation
- With your bot's HTTP API token and your group's chat ID, you're ready to integrate your bot with Zapier for automation purposes
The Sub-Zap: Where Magic Happens
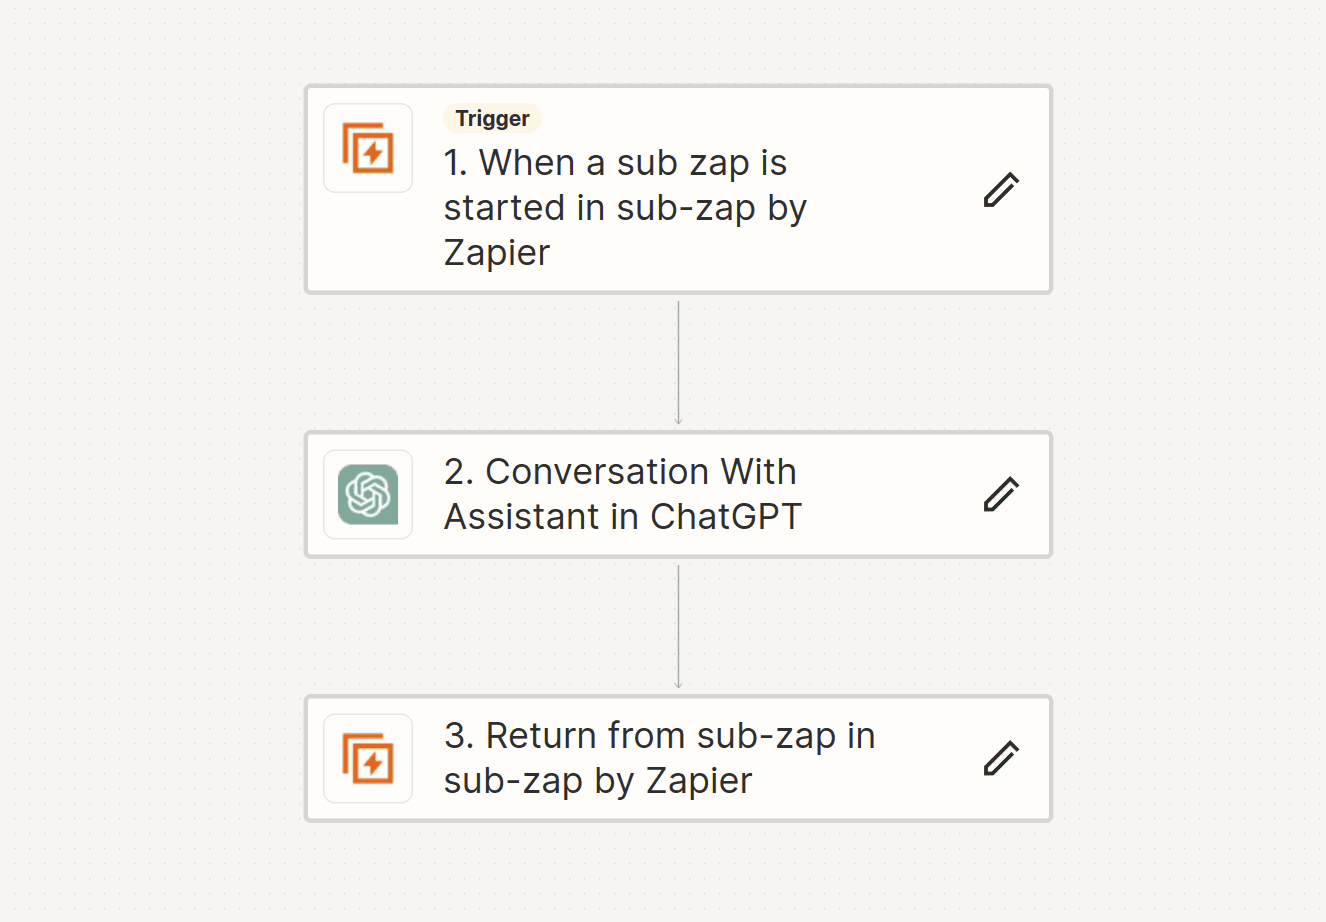
The Sub Zap is responsible for sending the email content to OpenAI and processing the result. The result is then sent back to the original Zap. Head over to the OpenAI Playground and create a new Assistant.
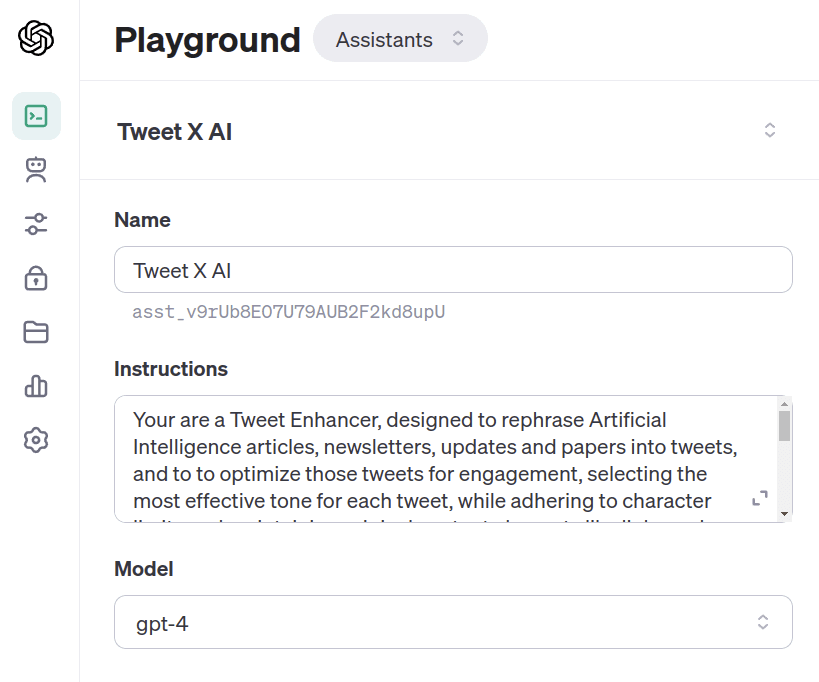
You can use the following prompt to generate a Summary Thread:
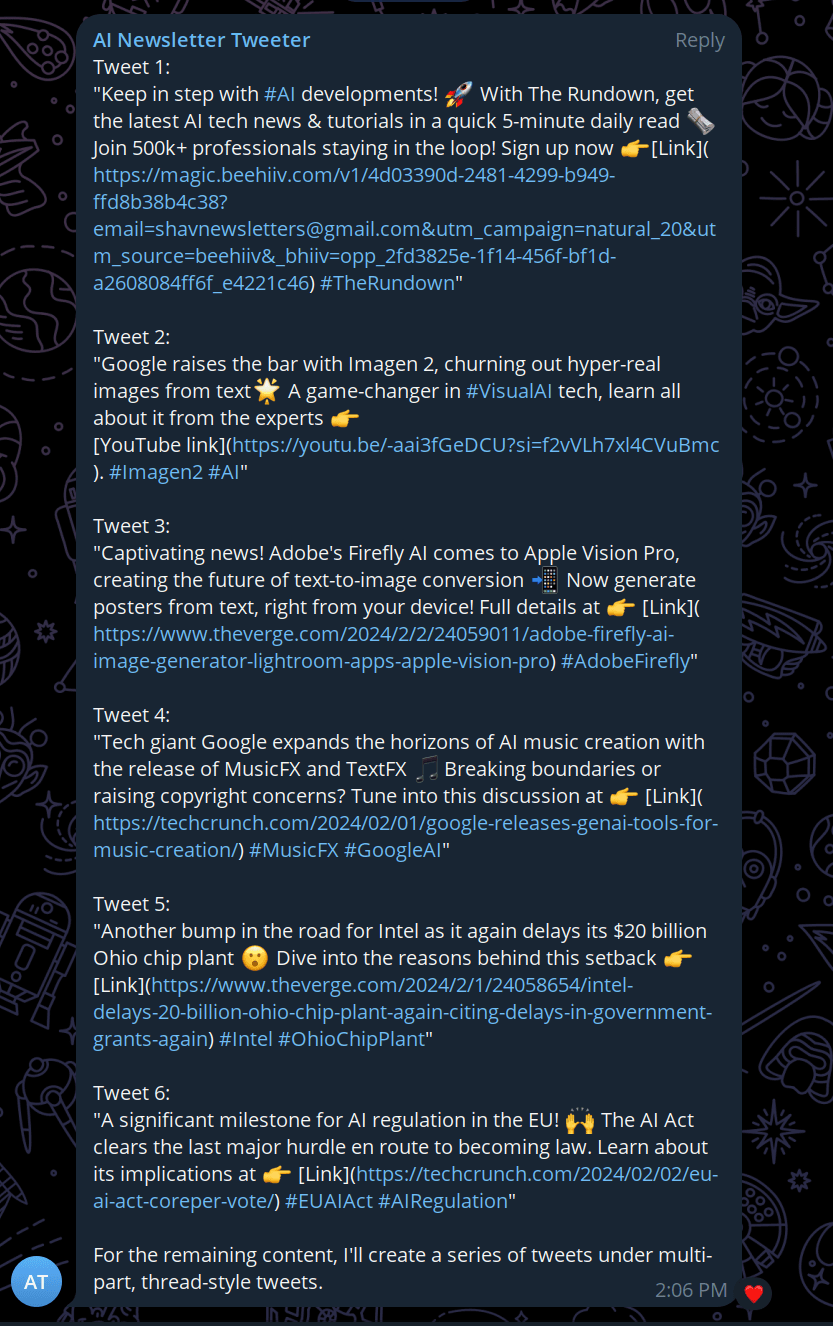
You're a News Summarizer, designed to rephrase Artificial Intelligence articles, newsletters, updates and papers into bullet point updates, and to to optimize those bullet points for distilling the important updates that a Data Scientist should be aware of in the AI space. You should maintain original content elements like links and hashtags as indented bullet points. Simpler words are better than sophisticated words. Main messages should be preserved, a person who reads your bullet points should get the same messages as reading the original article or newsletter. The user will provide email bodies, and you should ONLY use this context and nothing else to generate the summary.Once you have created your Assistant, you can use the SubZap to send the email content to the Assistant and process the content. In the last leg of our automation the result is then sent back to the original Zap, and sent to our Telegram group for us to conveniently review and stay up to date with AI news!
Update 22-02-2024: Unfortunately, Zapier now keeps multi-step zaps behind a paywall 😔, so let's rebuild our Newsletter summarization pipeline ourselves in AWS!
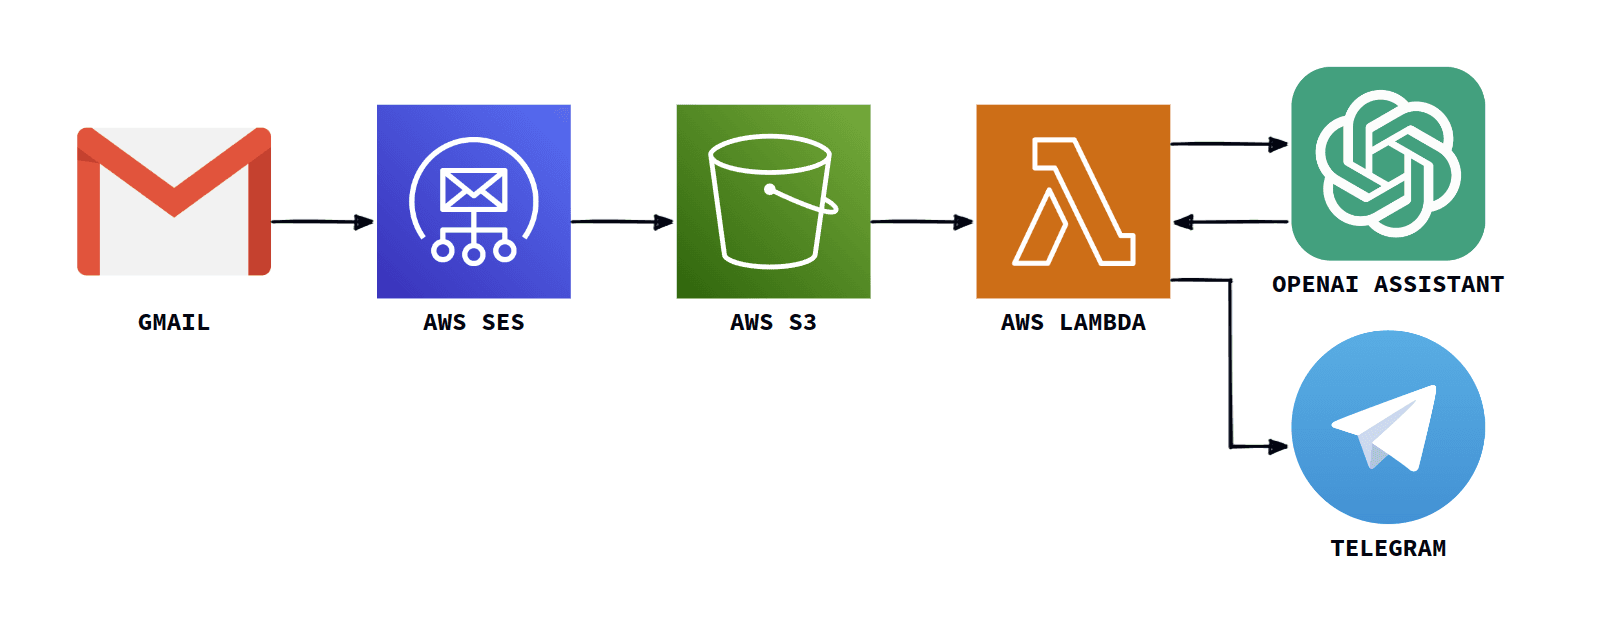
Using AWS SES & Lambda
The stack I settled on uses AWS SES and Lambda and of course OpenAI. Completely serverless and very cheap to run! Amazon Simple Email Service (SES) is an email platform that provides an easy, cost-effective way for you to send and receive email using your own email addresses and domains.
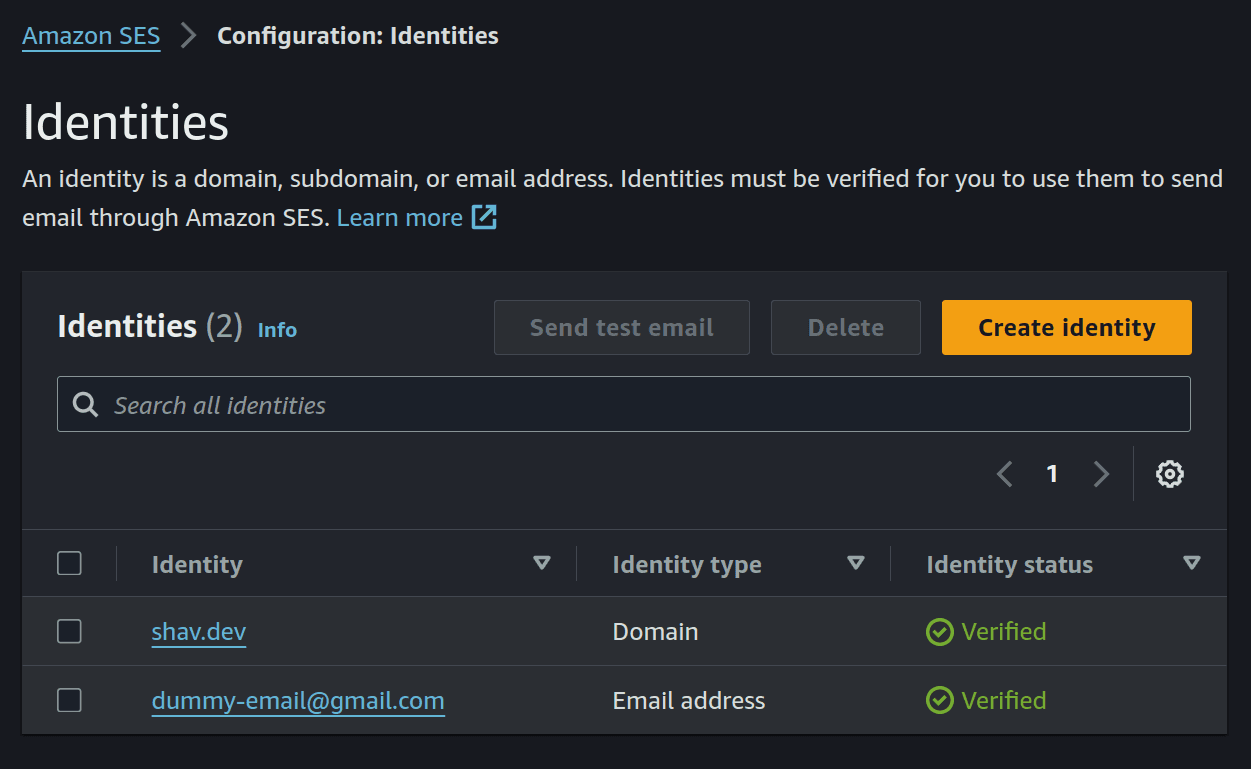
Get started with SES by verifying an email address and sending domain. You just use the SES account set up wizard to set up your account to do this part. Note that to have Amazon SES manage your incoming email, you need to add an MX record to your domain's DNS configuration. The MX record that you create refers to the endpoint that receives email for the AWS Region where you use Amazon SES. For example, the endpoint for the EU West (London) Region is inbound-smtp.eu-west-2.amazonaws.com.

This should get you going with the verified identites you need:
Once you've done that, we need to set up an Action in your SES Rules Set to automatically PUT your email files into S3. Why not just use the Lambda action? The AWS docs state themselves that if we add a Lambda action to a receipt rule, Amazon SES will indeed send an event record to Lambda every time it receives an incoming message. This event contains information about several of the email headers for the incoming message, as well as the results of several tests that Amazon SES performs on incoming messages. However, importantly, it omits the body of the incoming email. SES won't send the whole email body to lambda as bodies can get quite large, so we save in S3 first, and use the PUT to the S3 bucket as the trigger for the lambda function.
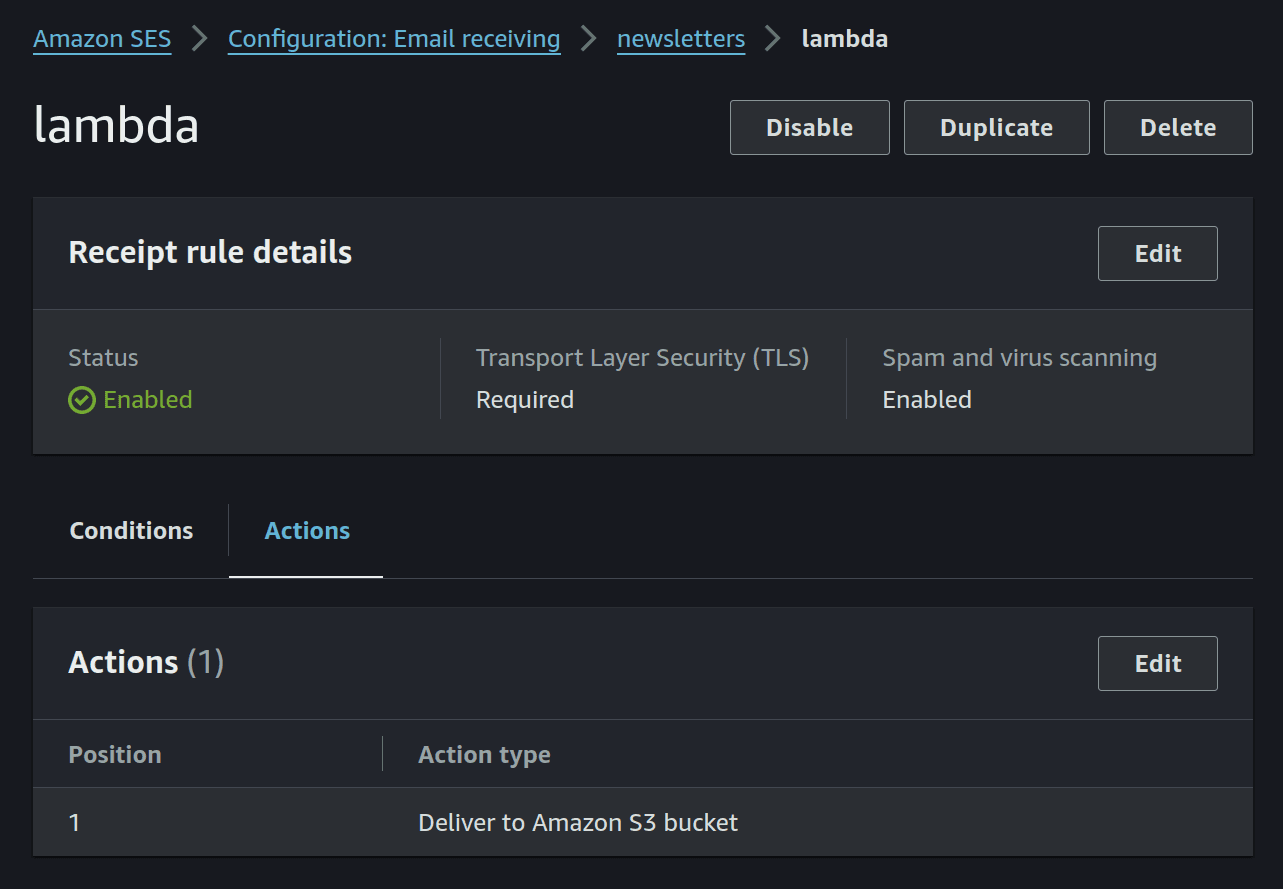
It's also useful to add a Recipient condition to specify which email is allowed to send to the rule. This is useful if you have multiple rules and want to make sure that only the correct emails are sent to the correct rule.
S3
A small note on the S3 bucket is that you need to give Amazon SES permission to write to your Amazon S3 bucket. For example, you can use the following policy to grant Amazon SES permission to write to your Amazon S3 bucket:
{
"Version": "2012-10-17",
"Statement": [
{
"Sid": "AllowSESPuts",
"Effect": "Allow",
"Principal": {
"Service": "ses.amazonaws.com"
},
"Action": "s3:PutObject",
"Resource": "arn:aws:s3:::BUCKEN_NAME/*",
"Condition": {
"StringEquals": {
"aws:Referer": "YOUR ID"
}
}
}
]
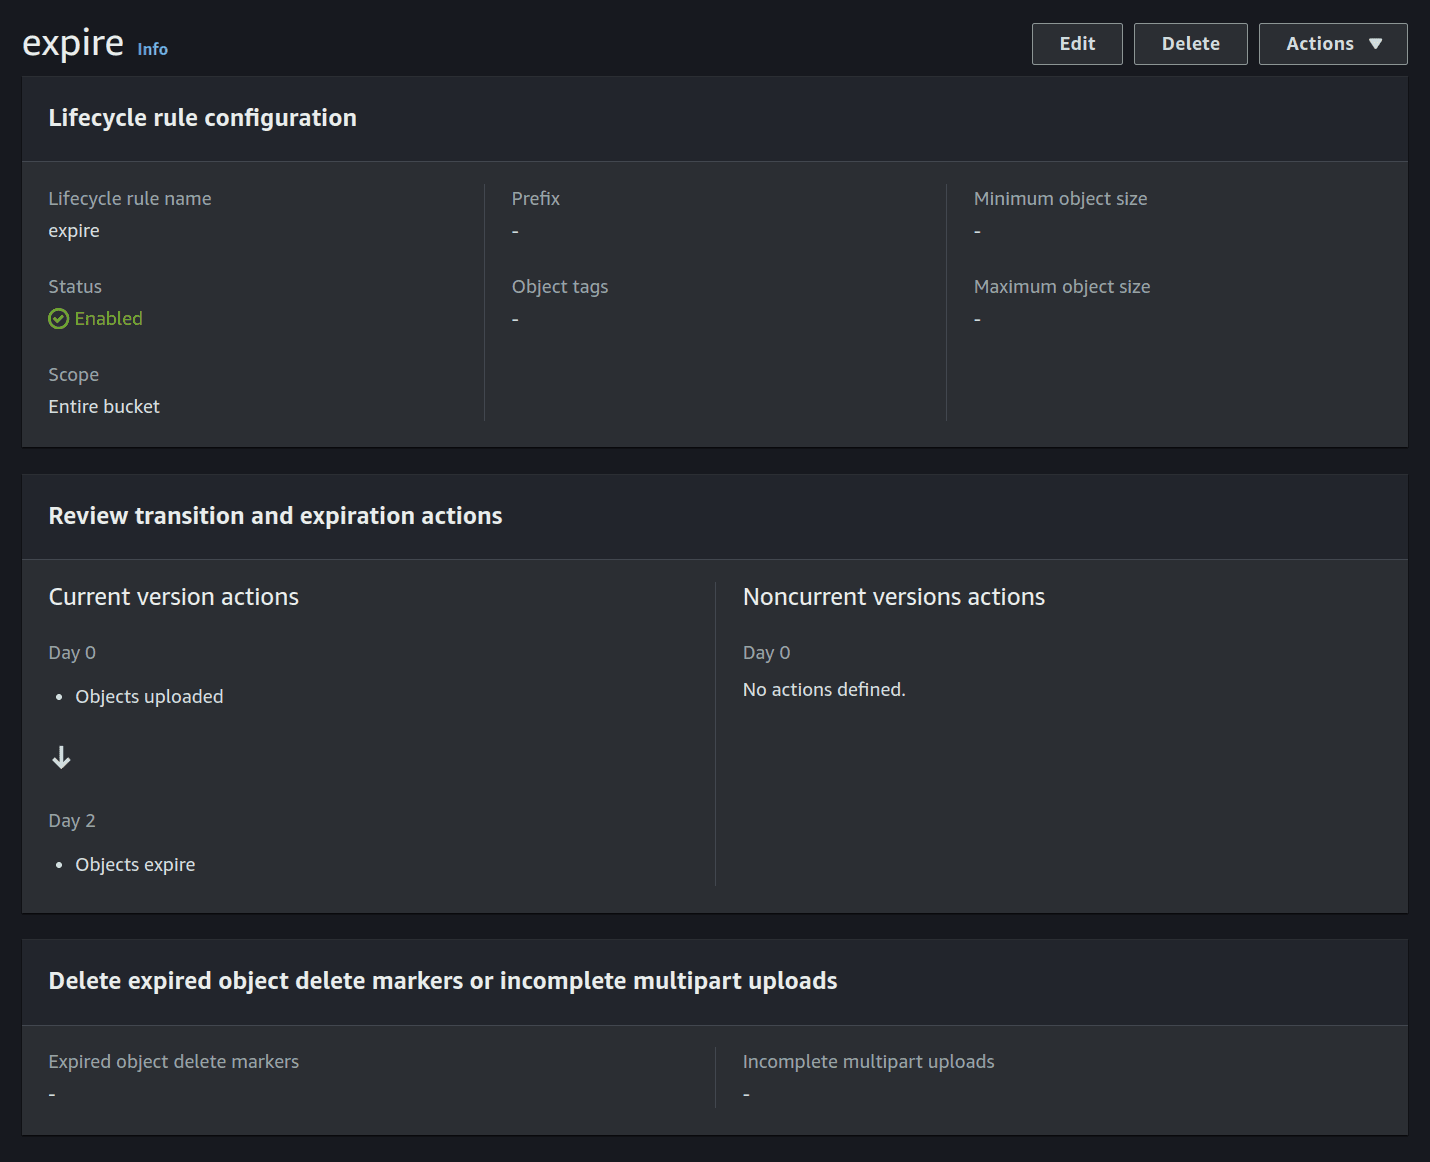
}It'll also help to add some Lifecycle rules to the bucket to keep it clean and tidy. I have chosen to expire the objects after 2 days, but you can choose whatever you like.
Lambda Action
The AWS SES documentation shows "Example 3: Retrieve email from Amazon S3" demonstrating the steps required to obtain your email from S3. This is the template I started with. Although, we will also need to make some edits to this code. For example, we will need the requests library to send requests to the OpenAI API, as well as send to Telegram. On Oct-21-2019 Botocore removed the vendored version of requests. To use requests I use one of Keith's Layers (Klayers) so I don't need to mess about with creating a layer myself. My final code using python 3.9 looks like this:
import json
import urllib.parse
import boto3
from email import message_from_bytes
from email.policy import default
import os
import time
import requests

print('Loading function')

s3 = boto3.client('s3')

def lambda_handler(event, context):
    bucket = event['Records'][0]['s3']['bucket']['name']
    key = urllib.parse.unquote_plus(event['Records'][0]['s3']['object']['key'], encoding='utf-8')
    try:
        response = s3.get_object(Bucket=bucket, Key=key)
        email_content = response['Body'].read()
        # Parse the email content
        msg = message_from_bytes(email_content, policy=default)
        # Extract the subject
        subject = msg.get('Subject', 'No Subject')
        # Initialize an empty string to hold the email body
        body = ""
        # Check if the email is multipart (has multiple parts, e.g., text and HTML)
        if msg.is_multipart():
            for part in msg.walk():
                # Look for the text/plain part
                if part.get_content_type() == 'text/plain':
                    body = part.get_payload(decode=True).decode('utf-8')
                    break  # Stop after finding the first text/plain part
        else:
            # If it's not multipart, just get the payload
            body = msg.get_payload(decode=True).decode('utf-8')
        assistant_messages = get_resp_from_assistant(body)
        success = send_to_telegram(assistant_messages, subject)
        return success

    except Exception as e:
        print(e)
        print('Error getting object {} from bucket {}. Make sure they exist and your bucket is in the same region as this function.'.format(key, bucket))
        raise e
Invoking the OpenAI Assistant
Now we need to deal with how we invoke our OpenAI Assistant from get_resp_from_assistant(). To do this, we follow the OpenAI docs. In order, we need to:
- Create a Thread - A Thread represents a conversation
- Add a Message to a Thread - A Message contains text, and optionally any files that you allow the user to upload. Messages need to be added to a specific Thread
- Run the Assistant - For the Assistant to respond to the user message, you need to create a Run. This makes the Assistant read the Thread and decide whether to call tools (if they are enabled) or simply use the model to best answer the query. As the run progresses, the assistant appends Messages to the thread with the role="assistant". The Assistant will also automatically decide what previous Messages to include in the context window for the model
- Check the Run status - By default, a Run goes into the queued state. You can periodically retrieve the Run to check on its status to see if it has moved to completed
- Return the Assistant's response - Once the Run completes, you can list the Messages added to the Thread by the Assistant
My function to do this in Python looked like:
def get_resp_from_assistant(email_body):
    """
    Function to call OpenAI's Assistant API
    """
    try :
        openai_api_key = os.getenv('OPENAI_API_KEY')
        assistant_id = os.getenv('OPENAI_ASSISTANT_ID')
        # Base URL for OpenAI API
        base_url = 'https://api.openai.com/v1'
        # Headers including the Content-Type, Authorization, and OpenAI-Beta features
        headers = {
            'Content-Type': 'application/json',
            'Authorization': f'Bearer {openai_api_key}',
            'OpenAI-Beta': 'assistants=v1'
        }
        # Create a new thread
        thread_create_response = requests.post(f'{base_url}/threads', headers=headers, data=json.dumps({}))
        thread_id = thread_create_response.json()['id']
        # Add a message to the thread
        add_message_url = f'{base_url}/threads/{thread_id}/messages'
        message_data = {
            "role": "user",
            "content": email_body
        }
        requests.post(add_message_url, headers=headers, data=json.dumps(message_data))
        # Create a Run
        create_run_url = f'{base_url}/threads/{thread_id}/runs'
        run_data = {
            "assistant_id": assistant_id,
        }
        run_response = requests.post(create_run_url, headers=headers, data=json.dumps(run_data))
        run_id = run_response.json()['id']
        # Wait a bit before checking the run status to give it time to process
        time.sleep(5)
        # Check the Run Status
        status = "in-progress"
        check_run_status_url = f'{base_url}/threads/{thread_id}/runs/{run_id}'
        while status == "in-progress":
            status_response = requests.get(check_run_status_url, headers=headers)
            status = status_response.json()['status']
            if status != "completed":
                # wait another 5 seconds
                time.sleep(5)
        # List Messages in the Thread
        list_messages_url = f'{base_url}/threads/{thread_id}/messages'
        messages_response = requests.get(list_messages_url, headers=headers)
        # Extract assistant messages
        assistant_messages = [msg['content'][0]['text']['value'] for msg in messages_response.json()['data'] if
                              msg['role'] == 'assistant']
        return assistant_messages
    except Exception as err:
        print(err)
        return ["Error in calling ChatGPT"]
Finally, we need to send the response to Telegram. To do this, I am just going to use the same bot token as before, and the same chat_id. We just format the message we want to send as text and make a post request to the Telegram sendMessage API. My send_to_telegram() function looks like this:
def send_to_telegram(assistant_messages, email_subject):
    """
    Send the assistant messages to Telegram
    """
    message_body = "\n".join(assistant_messages)
    # add the email subject to the message
    message = f"**{email_subject}**\n\n{message_body}"
    try:
        # Environment variables for the Telegram bot token and chat ID
        telegram_bot_token = os.getenv('TELEGRAM_BOT_TOKEN')
        telegram_chat_id = os.getenv('TELEGRAM_CHAT_ID')
        # URL for the Telegram sendMessage API
        url = f'https://api.telegram.org/bot{telegram_bot_token}/sendMessage'
        # The message body
        body = {
            'chat_id': telegram_chat_id,
            'text': message,
            'parse_mode': 'Markdown'
        }
        # Make the POST request to Telegram
        response = requests.post(url, json=body)
        # Parse the response from Telegram
        response_json = response.json()
        success_bool = response_json['ok']
        # Return success status
        return {'success': success_bool}
    except Exception as err:
        print(err)
        return {'success': False}
Remember to add your environment variables to the Lambda function. You can do this by clicking on the Configuration tab in the Lambda console, and then scrolling down to the Environment variables section. Here you can add your variables and their values.
Forwarding Emails to SES
The last thing we need to do is direct our emails to SES. Directing emails to SES for processing can be set up via Gmail's forwarding settings, allowing you to either forward all incoming messages or only those fitting specified criteria.

- Open Gmail - On your computer, open Gmail using the account that you want to forward messages from
- Access Settings - In the top right, click Settings and then "See all settings"
- Navigate to Forwarding - Click on the "Forwarding and POP/IMAP" tab
- Add Forwarding Address - In the "Forwarding" section, click "Add a forwarding address"
- Enter Email - Enter the email address that you want to forward messages to
- Confirm - Click Next and then Proceed and then OK
- Verify - A verification message will be sent to that address. Click the verification link in that message
- Return to Settings - Go back to the settings page for the Gmail account that you want to forward messages from and refresh your browser
- Enable Forwarding - Click on the "Forwarding and POP/IMAP" tab
- Select Forward Option - In the 'Forwarding' section, select "Forward a copy of incoming emails to"
- Choose Action - Choose what you want to happen with the Gmail copy of your emails. They recommend that you "Keep Gmail's copy in the Inbox"
- Save - At the bottom of the page, click "Save Changes"
And that's it! You should now have a serverless pipeline that takes your emails, sends them to OpenAI, and then sends the response to Telegram.
You can also add more steps to the pipeline, such as saving the email to a database, or sending the response to another service. But that's what I use to keep up to date with the latest AI news!